Monday, December 23, 2013

Gift Card Holder

I saw this super quick and easy gift card holder on Dawn's website.  It is a quick tutorial and Dawn gives great directions.  You can find it here.  

I used kraft for the base with layers of SN@P paper (leftover from a couple of previous posts), kraft, and Whisper White.  I used the Nestabilities Labels One, scalloped squares, and classic squares.  The embossing folder is from Paper Studio at Hobby Lobby.  The notch for the gift card is made using the SU decorative label punch.  The image on the front is from SU's Endless Wishes - my favorite stamp set - in Soft Sky, Baja Breeze, and Soft Suede.  (I should have used Crumb Cake, oh well.)  I covered the square in versamark ink, then embossed with iridecent ice embossing powder.  I added a couple of pearls to make it pop, but wanted it to be as flat as possible for mailing.  I also added a tag from SU's Tags til Christmas set, stamped in Baja Breeze, and attached with a SU mini clothes pin.  Thanks for looking!  April

inside of card
finished card with tag

Sunday, December 22, 2013

gift card holder

I had some left over paper from yesterday's post so I decided to make a gift card holder for my son's to use for their sister's gift.  I used the ornamental die from Tim Holtz on kraft paper, cutting twice.  I also cut the extra SN@P paper and the scalloped border in Whisper White.  I used the Zig two-way pen around the edges to seal, leaving the top open to slide the gift card in.  The banner is made from Whisper White and the To/From is from the SU Season of Style rotary stamp. 
I stamped the front panel with the SU Christmas star and heat embossed in metallic silver.  Next, I spritzed it with Heidi Swapp in aquamarine.  I used the left over edges of the die to make the banner pieces.  I used the Christmas stamp from retired So Many Scallops in Basic Grey and punched with the scallop circle.  I used the 3/4" circle to punch the snowflake in the middle, popping it up on a dimensional.  Last, is a large brad to make a hinge for the holder.  Thanks for looking!  April
 

Saturday, December 21, 2013

Teacher gifts part 4

This is the last of the teacher gifts for this year.  My son's teacher loves movies so we did a little investigating and learned a bit more about his favorites.  He really likes Redbox rentals and Reece's cups, so we put together a little movie kit.  Inside is two packs of microwave popcorn, a big bag of mini Reece's cups, and a gift certificate for Redbox rentals.  (They do not have plastic gift cards, but you can order a certificate by email and print the certificate.)  I used SN@P paper to make a holder for the gift certificate and the belly band around it.  I used the decorative label punch and the Tags til Christmas stamps on the band.  I also used a leftover piece of silver glitter (from the inside of the angel ornament's halo) to add a bit more sparkle. 
The topper of the gift is made with the ornamental die from Tim Holtz.  This also uses the SN@P papers, SU scalloped border punch, decorative label punch and SU's Endless Wishes photopolymer stamps.  Thanks for looking!  April


Thursday, December 19, 2013

Paper Bow Angels

I learned how to make these at our stamp club.  These use the XL bow die from Stampin' Up, but I am sure you could use the one from Tim Holtz as well.  The bows are the wings and arms, the tails make the skirt.  The straight piece that would wrap around the middle is used to attach the head to the body on the back.  The head is made with two punched circles that sandwich the hanger string and halo in between.  The halo is made by punching a 1 1/4" circle then a 1 3/4" circle off center.  The bouquet in her hands is the smallest scalloped circle SU offers.  We used a lot of glue dots and I can honestly say I would rather hot glue or tacky tape for sure.  Once we were done, I realized I would also make a second set of the tails or double sided paper to make it look more finished on the back as well.  Thanks for looking!  April


Wednesday, December 18, 2013

Quick & cute Snowman nuggets

We also made these little guys at our monthly stamp club.  They are Hershey's nuggets wrapped with little strips of paper (or you can use printer labels) and hand drawn faces.  The hats are made by cutting off the fingers from knit stretchy gloves.  You can find 2 pairs for $1 at Dollar Tree.  Just roll the finger down to shape into a hat, then attach to the nugget with a glue dot or piece of sticky tape. 
This would be an excellent kids craft.  Pre-cut the gloves apart and give them the pieces.  So cute and you can make a bunch in no time.  Thanks for looking!  April

Teacher gifts part 3

This is theanother teacher gift for this year.  I made this at the monthly stamp club I attend.  The snowflake ornament is from SU's Festive Flurries snowflake kit.  It was very quick and easy to put together, only taking as long as the hot glue took to set up. 


We also put together the brown treat boxes with a little stamping and heat embossing.  I figured out the snowflake ornaments just barely fit inside the box and one of the ladies in my group mentioned that the left over tissue from our monthly paper pumpkin kits matched perfectly, so we added some of that as a bed for the ornament to rest on. 
I added a bit of baker's twine and a tag to finish it off.  Thanks for looking!  April

Saturday, December 7, 2013

November My Paper Pumpkin

I am putting together a lot of small card packages together for my kids teachers and helpers.  As soon as I opened this up, I knew it was a fantastic gift.  I followed the instructions with no alterations because I was really not overly inspired and the set was pretty cute to start with.  I stamped the flaps of the envelopes with the star, the popped the set into a baggie, adding a topper of kraft, Real Red, and Very Vanilla.  I had a little bit of the stitched ribbon left over from stamp club and added the sentiment from SU's Endless Wishes in Real Red and Basic Grey.  Super simple gifting AND I get to keep the stamps.  Thanks for looking!  April

Friday, December 6, 2013

Teacher Gifts, part 2

This is for my youngest child's student teacher.  I wanted to give her a little something and I got this little box of chocolates at Hallmark when I picked up the kids' ornaments.  I used kraft and left over patterned paper from DCWV's Christmas stack.  The image is from TGF's Tea-rific photopolymer set.  (I am entering this into the TGF Farm Fresh Friday sparkle challenge.)  The image is colored in copic markers and I added accents in Sukura Stardust clear gel pen to make it sparkle.  It is around the rims, stripes, blooms, swirls and plate.  I can't get a good angle to make it pop, but you can see a bit of it in the photo below.  I cut it out using Nestabilities circle and layered it on a Nestabilities scalloped circle cut from Cherry Cobbler.  Both layers are mounted with dimensionals.  I left two sides of the base open to slide a tag in with a coffee gift card attached.  I used a little jute twine and left over ribbon to make a pull tab for the card.  Thanks for looking!  April
close up of sparkle


Tuesday, November 26, 2013

2013 Teacher gifts part 1

So my youngest has two teachers, a student teacher, and close to a dozen support staff.  Yea, that's a lot of gifts.  I decided to get his two crafty teachers the Stampin Up Stamp a Tag kit.  The box is so cute on its own that I decided to just dress it up a little.  I made paper bows from 1" strips of kraft cardstock, running it through the Paper Studio snowflakes embossing folder.  I used sticky strip to put all the pieces together and a square punch to notch the tails.  I punched the tag with the SU large tag punch and the sentiment is from Petite Pairs on Very Vanilla and stamped in Early Espresso ink.  I did one in red and one in green (not shown).  Thanks for looking!  April

Monday, November 25, 2013

Stamp Club extra

So this is a card made from some of the left over parts from my stamp club.  You can see the other cards here.  The base is Very Vanilla.  The Crushed Curry layer is embossed with the cheveron embossing folder from Paper Studio @ Hobby Lobby.  The stamped panels are mounted on Early Espresso core stock, then mounted with dimensionals.  I cut a couple of small strips to make a window ledge.  The strip at the bottom is Cherry Cobbler.  The sentiment is from the My Paper Pumpkin Welcome kit.  The stamps on the panel and accents are from SU's retired Day of Gratitude.  Thanks for looking!  April 

Sunday, November 24, 2013

Elf Feet card

So I wanted some quick to produce cards and to use up some left over Christmas papers.  I love the elf feet made from the top note die but they were too big for what I needed.  I grabbed the decorative label punch then cut the piece into four.  I used the 1/2" circle punch to notch out the front of the boot.  The boots are finished with mini pom poms.  The legs are made using candy cane stripped washi tape.  The sentiment is from SU Endless Wishes.  I packaged it for gift-giving, using the November My Paper Pumpkin sentiment.  Thanks for looking!  April

Wednesday, November 20, 2013

Tags til Christmas gift

This is SU's Tags til Christmas set.  The design for this tag gift set comes from Dannie at Dannie's Designs.  She has a fabulous tutorial you can see here
I used Marina Mist for the box.  The clear film is an overhead transparency.  Inks used are Old Olive (with Red Riding Hood), Marina Mist, Real Red (with Basic Grey), and Early Espresso.  To finish, I wrapped the box with red baker's twine several times, so the user can recycle the twine for the tags. I made 3 boxes in just over an hour, so these would be very easy to mass produce.  Thanks for looking!  April 

Monday, November 18, 2013

A Little Dash of Merry

This is another card using SU's Endless Wishes photopolymer set.  I used a kraft base with layers of Very Vanilla and Early Espresso, using the triple stamping technique.  Inks are Crumb Cake, Soft Suede, and Early Espresso.  All the layers are mounted on dimensionals.  The sentiment is punched out using the decorative label punch, using the long side.  I punched another in Early Espresso, cutting in half to make it larger to frame the sentiment.  I mounted it on dimensionals and added a gemstone to finish it off.  Thanks for looking!  April

Saturday, November 16, 2013

Sending Many Thanks set

This is another gift packet I put together.  It is similar to the card perviously posted, but I made Thank You cards, as well as turning the card on its side.  The card is kraft cardstock with another layer of kraft.  I used Season of Style washi tape from SU and the ornament from Tags til Christmas stamped in Old Olive.  I added a few gemstones, adding a Cherry Cobbler baker's twine bow, then popped it up on a dimensional.  I pierced the upper right corner, before stamping the sentiment from Petite Pairs in Early Espresso.  I left the inside blank for notewriting. 
The topper is kraft and Very Vanilla, using the same supplies.  The sentiment is from SU's Endless Wishes. 
Thanks for looking!  April
NOTE:  Sorry for the glare off the bag.  I took several pics and this was the best one. 

Thursday, November 14, 2013

Very Merry Wishes

This one is a little more rustic Christmas card.  I used a base of kraft cardstock with an additional layer of kraft mounted on dimensionals.  I made banners from the Season of Style washi tape.  The ornament is stamped in Old Olive from SU's Tags til Christmas set, then punched with the coordinating ornament punch.  I added rhinestones to the ornament before sliding it under the Cherry Cobbler baker's twine.  Next, I pierced the bottom right corner before stamping the sentiment from Endless Wishes in Old Olive.  Thanks for looking!  April

Tuesday, November 12, 2013

christmas note gift set

This is another CASE from the SU ad for the new Endless Wishes photopolymer set.  It is a super simple card and very appropriate for mailing.  Colors are Soft Sky, Pool Party, and Real Red.  The last touch are a few scattered rhinestones.  I also stamped snowflakes on the envelope flaps to match, then made toppers from Pool Party and Whisper White papers.  I used the scalloped border punch and pulled some red buttons and baker's twine from my stash to finish the look.  Each are bagged for quick giving.  Thanks for looking!  April
close up of card


Monday, November 11, 2013

Celebrate the Season

I was so excited to get the new SU photopolymer set Endless Wishes.  I was told that I was very lucky as SU has not been able to keep up with the demand and has currently put a hold on it.  I don't normally buy many holiday-specific stamps, but love how flexible this set is...you can change the entire thing by just by changing out the stamps. 
Anyway, I loved the samples SU used in the ad, so I decided to CASE my Christmas card from it.  I managed to make 50 cards fairly quick.  I used kraft base cards from Hobby Lobby - the larger sized cards, not the standard 4x5.  I altered a couple of things - first, the adorable snow charms that SU used are so cute, but really expensive and not at all good for mailing (especially in bulk).  I decided to use the middle size heart from the triple heart punch.  Second, I swapped colors...I used Tempting Turquoise and Real Red, in place of Pool party and Strawberry Slush.  I also cheated and stamped my own polka dot paper using a large background stamp and Whisper White craft ink. 
Inside, I stamped "sending you very merry christmas wishes."  (Can you believe that it was FOUR stamps?) 
The last touch was stamping the envelope flaps to match. 
Thanks for looking!  April

Saturday, November 9, 2013

One Sheet Wonder

This month, my stamp club used a technique called One-Sheet Wonder.  We stamped a 6x6 sheet with a fall themed stamp set of our choice (mine is SU's Day of Gratitude), then cut the sheet into several different sized pieces.  I made five cards and still have pieces left over for two more.  Colors used are Crushed Curry, Old Olive, Early Espresso, Crumb Cake, Pumpkin Pie, and Cherry Cobbler.  I used my new honeycomb embossing folder for one of the cards, as well as trying the multi-layered stamping.
Thanks for looking!  April


Thursday, November 7, 2013

HB2U

This is for my sister-in-law's birthday.  The base is from a notecard set I bought at JoAnn's.  The designer paper is scraps from the Percy card I did a few days ago and is from Bo Bunny.  I used the Autumn Leaves license plate, stamped in Jet Black Staz-On, then the edges inked in Marina Mist.  The other inks are Bermuda Bay, Real Red, and Pumpkin Pie.  The screws are brads I found at Michael's.  I spritzed the entire card in Heidi Swapp tinsel and Smooch Gold Glow.  Thanks for looking!  April

Tuesday, November 5, 2013

Friends Until the End

This is a birthday card for my BFF.  It features My Favorite Things Well Read and is colored in copic markers and paper pieced.  The base is white with layers of Recollections dark red and the designer paper is from Bo Bunny.  I used a Nestabilities die for the banner, inking with Marina Mist, before mounting with dimensionals.  Last, is a bit of black baker's twine along the top of the card.  Thanks for looking!  April

Thursday, October 31, 2013

Halloween shaker box

So I decided to try my hand at a shaker box.  I used a tutorial from Meg at Loven Stamps.  You can see the tutorial here.  The secret?  She uses the foam from the stamp set to make the shaker!  So I just got the retired Jack of All Trades set that my soul sister was kind enough to pick up for me at a rubber rummage sale.  It still had the foam and I love the hat...it reminds me of the Harry Potter sorting hat! 
I used designer paper from a DCWV Timeless mat stack and the edging is cut using the deckled rectangle nestabilities, but moved to make it more square.  The hat is stamped in SU Early Espresso.  I followed the tutorial on how to remove the rubber from the foam, and used a little bit of liquid glass to seal it.  I keep the backing off the cheap dollar acryllic stamps because it makes perfect mini windows on cards.  (Hint: You can stamp on the acetate with Staz-On or SU Craft inks.)  I added a little bit of silver glitter, some googlie eyes, and a ghost charm I had in my stash.  Now I just have to think of a project to use it on! 
Thanks for looking!  April

Wednesday, October 30, 2013

TGF's Alter Ego!

TGF is hosting a new challenge called Alter Ego.  The idea is to combine two different TGF characters to make a new one. 
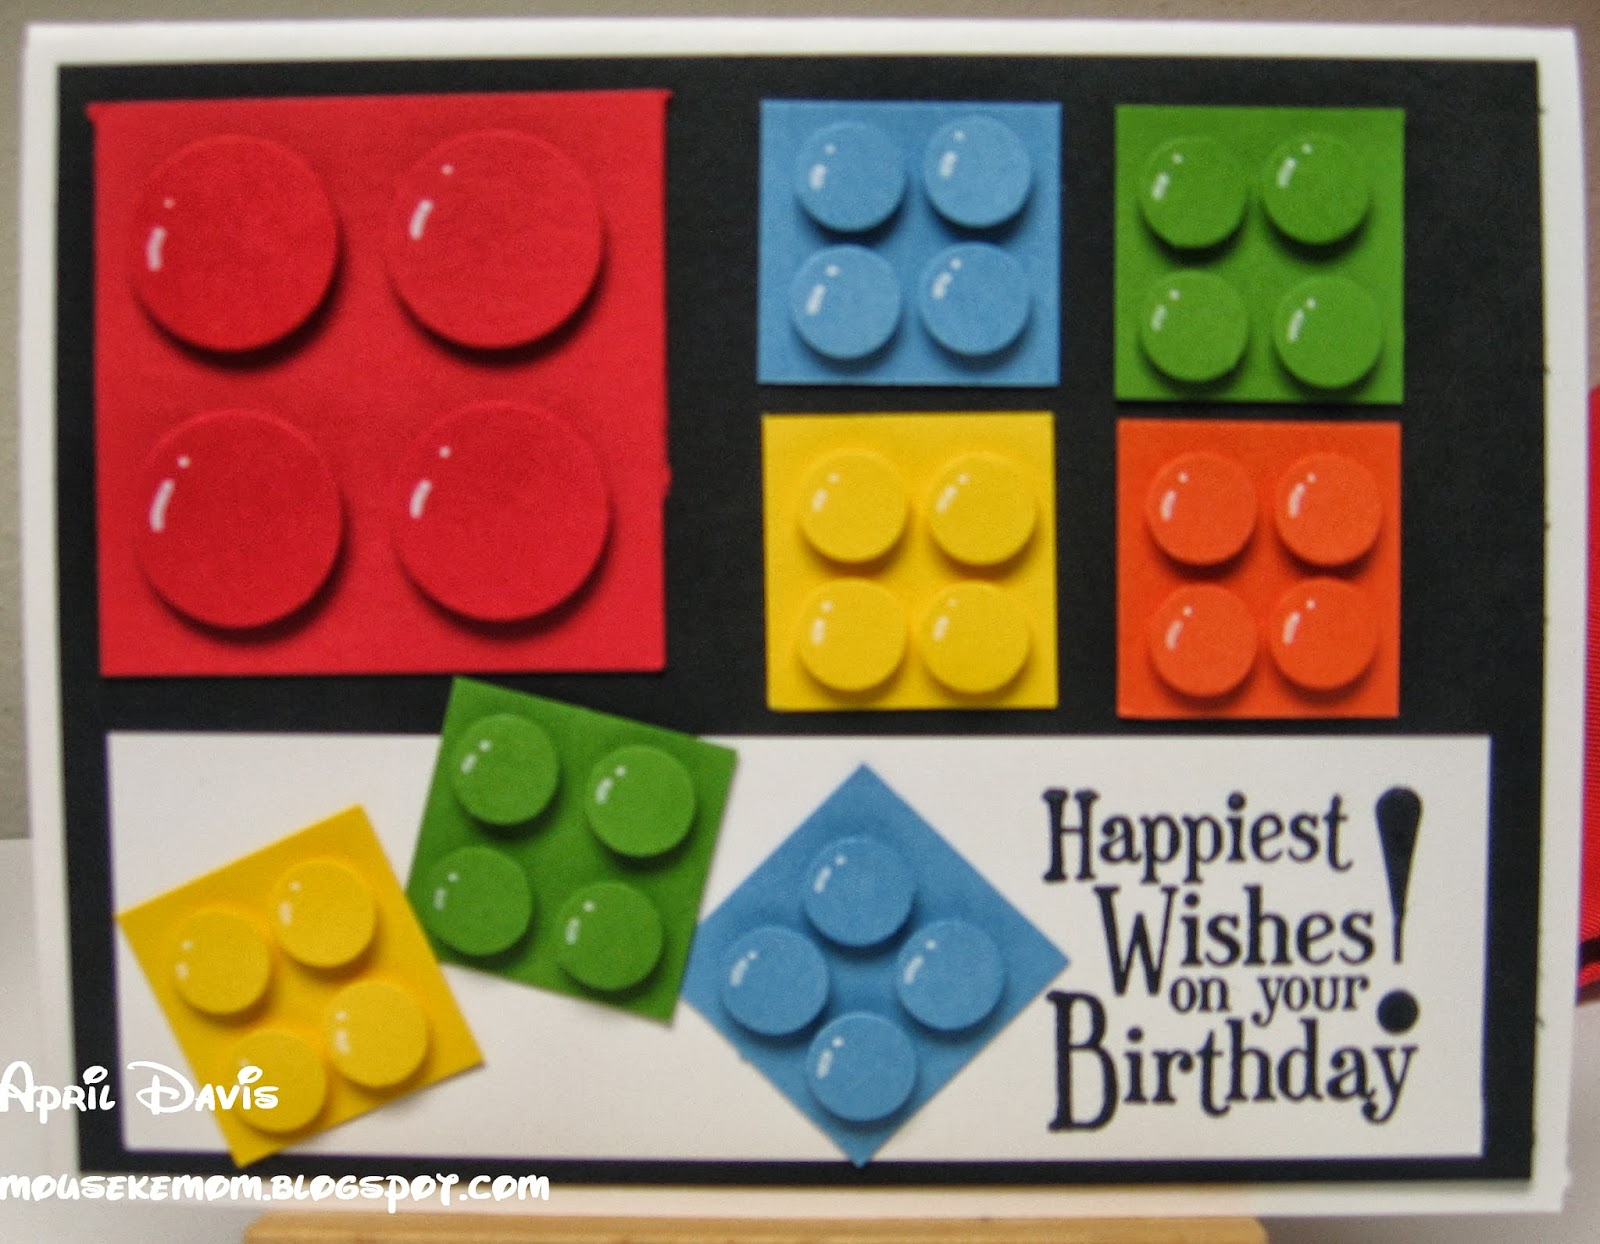
I have used this one before, seen here, but this is my Percy Jackson using Mer Ian and WS Flirty Edward digis.  I used Ian's head and Edward's body, but the trick is I copied his left side, flipping the image and moving it to the right, then adding a t-shirt under the open shirt.  His sword, Riptide, is a image I found online.  Percy is colored in copic markers, then cut out using Nestabilities Labels Seven.  I cut him so he looks like he is stepping out of the book (see one foot out of the book?).  I used my fingers to curve the paper and mount the "book" on dimensionals so the book seems to be rising off the base.  The text background stamp is from 7gypsies in Basic Grey.  The paper is Bo Bunny and Recollections on Very Vanilla base.  I used the film strip punch from EK Success for the strip border and some jute twine in a square knot to make it feel more like Percy's connection to the ocean.  I also tossed in some polaroid pics, especially one of his favorite demigod, Annabeth (from TGF's Miss Anya Hats Off).  The polariods are a die from Quik Kutz. Sorry I can't get a better image of the layers, but it kept coming out fuzzy.  Thanks for looking!  April

Cookie Monster Birthday Treats

My baby turned 7 yesterday...oh, where has the time gone?  He has developmental delays and has just finally fallen in love with Sesame Street.  He also loves cookies and m&m's, so when we found the m&m cookies at Sam's Club, I thought they would be perfect for his class-shared treat.
I used the Tim Holtz ornamental die to cut kraft paper and folded in half.  I used the Cricut to cut the scalloped circles at 1 3/4" from Mini Monograms on blue cardstock.  The eyes are punched from 3/4" circles on Whisper White.  The pupils and mouths are cut from Basic Black using the George and Basic Shapes cartridge at 1/4" circles and 1 1/2" ovals.  I punched the cookies from 1 1/2" circle on kraft, using a sharpie to make the "chips".  I used the scalloped circle punch to make the bite out of each, before mounting with a dimensional.  I used the SMASH tape on the base and a cheap dollar stamp for the sentiment in Chocolate Chip ink.  I attached the topper with a staple. 
Considering that I put together 30 of these, they were quick to assemble.  I highly recommend using a glue pen on the small pupils, but the rest was fine to assemble with a SNAIL-type adhesive.  Thanks for looking!  April

Thursday, October 17, 2013

Stamp Club cards, part two

I am back with the other cards we made at stamp club.  The first is a vintage card with the new SU stamp/emboss set.  We stamped the Whisper White with either Crumb Cake, then embossed, before adding pearls on the flowers.  We used strips of burlap and the SU vintage lace and button's with jute twine to finish the card.


Next, we used the new SU mosaic set in the current In Colors.  We also embossed the strip with an argyle folder and added gems to each of the tiles. 


Last, is my absolute favorite (since we have lots of Lego-crazy boys around our family).  It is simply different sized squares, lots of punched circle,s and dimensions.  Here's a quick tip: cut the excess of your dimensionals into pieces to fit the tiny parts.  You get more bang for your buck!  I used a white gel pen to add a little more dimension to the bricks. 
Thanks for looking!  April

Wednesday, October 16, 2013

Thanks Jack

This is a quick card I put together with some of my new toys I got from a rubber rummage sale and a RAK from my soul sister.  The base is Very Vanilla with layers of Early Espresso corestock and Pumpkin Pie.  The border punch is Martha Stewart fence.  The embossed layers are the new honeycomb emboss folder from SU.  I used a bit of sandpaper on the embossed image to bring out the core color.  The stamp set is Jack of All Trades (retired) and inked in Pumpkin Pie, Old Olive, Jet Black Staz-On, and Early Espresso.  The sentiment is from Day of Gratitude (also retired).  I used a bit of jute twine and a button from my stash to finish it off.  Thanks for looking!  April

Tuesday, October 15, 2013

Stamp Club Halloween cards

These are two of the cards we made at our stamp club.  The first one uses Moxxie papers, as well as SU.  The image and sentiment come from a SU set and absolutely escapes me what the name could be. 

The second is made with the SU web embossing folder (I think retired), the wide oval and 1" circle punches.  We drew in the legs and used black twine poked through the middle of the web and taped behind the spider and the legs are hand drawn.  Last, are a couple of googlie eyes.  The colors are Whisper White and Basic Black.  Very quick and easy to make.
I will also be posting the other cards we made in tomorrow's post.  Thanks for looking!  April
 

Monday, October 14, 2013

Christmas SWAP card

So this is my SWAP card for my stamp club.  I used Very Vanilla and cut rectangle panels at 1 3/8x3 1/4" and punched the squares from a 1 3/8" square punch from SU.  I used the SU word Window punch to make the knob plate and a brass brad for the knob.  I used a 3/4" circle punch on SU Garden Green, then punched again with the scalloped circle punch for the wreaths.  I used two for each wreath and inked them with Old Olive before stacking with dimesionals and adding bling colored with red sharpie marker.  The banner is made on SU Whisper White and stamped in SU Real Red with the SU Petite Pairs sentiment.  I warped the paper a bit and used a corner of the square punch to make the nothces.  The matching sentiment is stamped inside. 
I realized after I put them together that I forgot to emboss the door pieces with the wood texture embossing folder...oh well.  These came together pretty quick so they could be massed produced.  Thanks for looking!  April

Friday, September 20, 2013

Fight like a Girl

My BFF's mom was recently diagnosed with uterine cancer, so I decided to make a card to send her.  I checked online and learned uterine cancer is a peach ribbon, so I used Peach Parfait to make her card.  The stamps are from MFT's girl graphic tee set and is stamped in Pumpkin Pie and Chocolate Chip.  I stamped the ribbons all over the base of the card, then layered with Chocolate Chip textured cardstock, Peach Parfait that is punched with the mini dotted scallop border punch from EK Success, and a doily.  The flower is from a tutorial I did a couple of years ago, using flower confetti from Michael's Brides line.  You can find them in colors now, as well as the pearly white.  I used a copic marker to color the gem in the center before attaching with glue dots.  Thanks for looking! April
 

My Paper Pumpkin Welcome kit

So I am trying out the SU subscription of My Paper Pumpkin.  While I like the premade kit, I absolutely love the alterations I have been seeing.  I knew I would do one like the sample showed but the rest I would play with.  I figured the finished products would make great gifts.  I also found a fab challenge group that utilizes the kits in their challenges at My Paper Pumpkin Challenge and this month is a shapes challenge
I found my inspiration for the alternatives on pinterest, but added a few tweeks of my own.  I have a MPP board where I have them all pinned.  So, without further ado, here we go...
all four cards and envelopes


alternative card #1
alternative card #2


alternative card #3
card as seen in MPP kit
packaged for gift giving
Thanks for looking!  April