Showing posts with label kids birthday. Show all posts

Wednesday, September 9, 2020

Gamer Birthday Card


My bff's youngest is a huge gamer so when I found the card from JenniferMaker.com I just could not resist!  The big thing to remember when you upload the file is to convert the score lines and attach them.  Once that is done, its just a few cuts.  The black takes two sheets, then one red, and a white scrap.  I will also mention to be aware of the thickness of your papers.  I used 110lb for the white and it was not a complete cut even when set to heavy cardstock.  I ended up repeating the cut 6 times!  As long as you do not unload the mat you can repeat the same cut.  The white layer has several delicate small cuts.  The gift card tucks behind the controller, but you can seal that off if you wish.  I added holographic paper behind the inner sentiment and heat embossed the birthday sentiment on the front in yellow.  Thanks for looking! 

April

Saturday, October 19, 2019

Epic Birthday

This card is for one of my son's friends.  I used Lemon Lime Twist, with layers of Basic Black and watercolor paper.  I used Lemon Lime Twist, Tempting Turquoise, and Green Galore inks to watercolor the background.  I stamped images from SU Epic Celebration in Momento Tuxedo Black.  The skaters are silhouettes cut from my Cricut machine.  Thanks for looking!  April

Friday, September 20, 2019

Donald Duck card

This is a card from Queen and Company's Magical Characters shaker die kit.  I chose not to make a shaker and just use the iconic Donald Duck sailor hat.  This card was fast and easy to put together.  I do recommend using an adhesive sheet on the back of the cardstock before cutting to make it easier to piece together.  I used the retired Stampin Up bow builder punch for Donald's bow.  Add a couple of buttons and some white gel pen details and there you have it.  Thanks for looking!  April

Monday, June 3, 2019

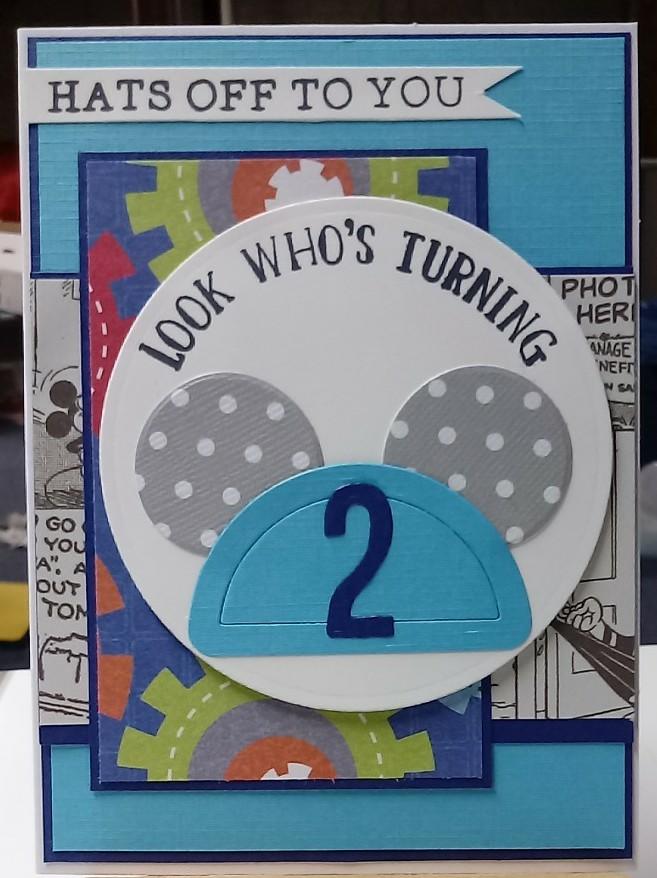
Hats Off

This is a birthday card I made for my nephew using the Queen & Company Magic shaker die set.  The base is Whisper White with layers of navy, turquoise, gray polka dot, and prints from Disney comics and Recollections gears.  Sentiments are from the coordinating Q & Co stamps and SU Number of Years.  I used the second to largest spellbinders circle die for the hat base.  The number 2 is a Tim Holtz die.  The circle is popped up with foam tape.  Inspiration for the card was found here.  Thanks for looking!  April

Tuesday, October 16, 2018

13th birthday

This card is for the youngest of my bestie's boys.  His milestone birthday was last month and I wanted a fun card for him that wasn't too babyish or girly.  (I will admit, I mixed up what his fav color with that of his brother -oops!)
The base of the card is kraft and stamped in Crumb Cake using Number of Years stamp set.  I inked the edges with Tim Holtz distress ink in Vintage Photo.  The sentiment is stamped in Momento Tuxedo Black.  The number is stamped on retired Green Galore with Green Galore ink, then cut with coordinating framelits.  I popped them up on dimensionals, as well as the little stars, punched from Daffodil Delight.  Last, a few flags made from washi tape, scrap Daffodil Delight, and vellum, attached with a mini staple.  
Thanks for looking!  April

Sunday, October 14, 2018

16th Birthday

I made this card for my son's best friend.  I love that my best friend's kids are my kids closest buddies and her boys love every hand-made card.  I try to keep in mind their interests or favorites and work them into the card.  This time, I focused on color and the big milestone.
The base of the card is Stampin Up Smoky Slate and stamped in Smoky Slate with Epic Celebration stamps.  I used layers from Picture Perfect Party (retired paper) and Basic Grey.  It is hard to see but the Basic Grey is stamped with Here's to an Epic Celebration in Basic Grey.  The 16 is stamped in Lemon Lime Twist on Whisper White, using the Number of Years set and cut with the coordinating framelits.  The "th" and "birthday" banner are also from the Number of Years set and stamped on Whisper White in Momento Jet Black Ink.
Inside, I did a simple layer of Whisper White stamped with the sneakers from Epic Celebration and the sentiment from Birthday Wit.  I colored the images with Lemon Lime Twist using a blending pen.  Thanks for looking!  April

Sunday, January 22, 2017

Harry Potter Birthday


gift bag with copic colored characters

Butterbeer with straw and wood owl
With teens, our go to birthday gift is a movie rental kit.  We put in a gift card to our local rental place, popcorn, and their favorite candies.  My son was invited to a Harry Potter themed party and insisted we put together a HP themed movie kit.  There are several pics but not everything in the kit is photographed.  We included a homemade "Liquid Luck" potion, packed in a gemstone shaped box, a decorated bottle of Butterbeer, a paper haystack filled with candy, Hershey's kisses decorated as Dementor Kiss-Aways, boxed candy wrapped in Honeydukes wrappers, an origami Howler (complete with Mrs. Weasley's rant), and several other surprises.  The kids went nuts when it came time to open it and it was the hit of the party.  Every kid told Alex they would definitely look forward to their birthday gifts!
gift card envelope, sealed with wax

origami Howler

Thanks for looking!
April

Monday, August 25, 2014

12th birthday card

So I absolutely need to catch up on birthday cards.  Sometimes they seem never ending but I love to hear from the recipients and makes me smile, so I insist on making each card, rather than buy it at Hallmark.  This is for my BFF's middle child who is turning 12 soon.
This card is made using the left over pieces from a long retired Stampin Up Simply Sent Rock Star set.  It is based on a similar card I found on Pinterest.  The stamps are Endless Birthday Wishes stamped in Bashful Blue and Old Olive.  The stars were leftover stickers from the set, popped up on dimensionals.  Coordinating colors include: More Mustard, Old Olive, Bashful Blue, Brilliant Blue and Whisper White.  It was super fast and easy to put together, taking less than 10 minutes.  Thanks for looking!  April

Monday, August 18, 2014

16th Birthday shaker card

My best friend's son is 16...oh how the years have flown by!  I wanted him to have a card as special as he is and for this big milestone.  I used some long-since retired SU papers that work with Pumpkin Pie, Old Olive, Whisper White, Bashful Blue, Apricot Appeal, and Tempting Turquoise.  I used my circle nestabilities to make the cuts and border.  I also recycled a backing from a photopolymer stamp set for the window.  The stamps used are from the retired SU Extreme Elements.  I stamped the splotch in Bashful Blue, then used the stamping off technique for the stars in Pumpkin Pie, before stamping the textured dots in Tempting Turquoise and the fleur de lis in Old Olive.  I cut the numbers from the Cricut Old West cartridge.  I added a couple of blue gems around the numbers before using foam to make the circle around the image.  I used some glitter, small gem stars, beads, etc to make the shakers.  I sealed the goods and ran a bead of liquid glass around the foam to help seal it all in place.  I suggest putting a weight over the card to make sure the seal sets.  I finished off the card with some stars I stamped and cut from the Perfect Pennants set in Old Olive and Pumpkin Pie.  I also used some leftover border stickers that came with the paper.  Thanks for looking!  April

Monday, July 28, 2014

9th Birthday wishes

This is for my BFF's youngest.  I finally got to break out the Just Add Cake DSP I got on clearance from SU.  The inspiration for this card comes from one found on Pinterest....here.
The base is Peach Parfait with layers of Early Espresso, Whisper White, So Saffron and the Just Add Cake paper.  I cut my base as an A2 card with a top fold.  I stamped the background in Pumpkin Pie using the new SU photopolymer Endless Birthday Wishes.  The Whisper White is punched using the scalloped border punch and the Early Espresso is embossed using the new large polka dot folder from SU.  I added a bit of stitching with my sewing machine.  The number is cut using the Cricut Don Juan cartridge with the shadow feature.  The tiny tag is cut with a scrap of Peach Parfait using a super cute Quik kutz tiny ticket die I found on clearance at Michael's for around a dollar.  Can't beat that, right?  I stamped a little mustache (one of a pair of stamps from the dollar bin) in Pumpkin Pie and wrote the name in white gel pen over top, adding it to the number with some white embroidery floss I had sitting around.  The sentiment is also from Endless Birthday Wishes and stamped in Early Espresso and Wild Wasabi.  Thanks for looking!  April

Friday, May 31, 2013

Birthday Treat topper

This was for my son's friend's birthday.  The fancy edge is one of the Tim Holtz border dies.  I used the Cuttlebug dominoes embossing folder and the die/emboss stamps came with my Cuttlebug and are mounted with dimensionals.  It's the first time I broke them out and, gosh, are they cute!  Colors are cranberry from Recollections, Only Orange, Brilliant Blue, and Whisper White from Stampin Up.  The baker's twine I got on a huge spool from TJ Maxx for $3.  Thanks for looking!  April

Friday, March 15, 2013

Birthday Sleepovers


So, I have two children with February birthdays and they both decided they wanted sleepovers with a few friends.  We had the boys over one week and girls the next.
The invites are Recollection cardstock with layers of designer paper from Paper Studio.  I printed the info on Vellum and used EK Success and Martha Stewart border punches on it before mounting it with baker's twine bows placed with retired SU brads.  The images are from CTMH's Under the Stars acrylic set, colored in copic markers, then mounted on the invitations with dimensionals. 
Thanks for looking!  April

Friday, August 17, 2012

Don't be angry...

Here is the other angry birds card I made for one of my bff's sweet boys.  The directions and inspiration for this came from Niki and you can find it here.  I didn't have all the punches, so I used my Cricut's George and Basic Shapes and some other punches to complete the cards. 
The card base is Whisper White with layers of Recollections blue argyle and Scrap Around the Blocks sea shells.  The sentiment is from SU's retired Grunge Rock.  Be sure to visit Niki's blog for the directions and list of supplies. 
Inside reads "Don't be angry, it's your birthday!"  I put the yellow one inside near the sentiment but cropped it to give you a close up.  Thanks for looking!  April

Tuesday, July 24, 2012

Angry Birds Birthday card

One of my BFF's sons is about to celebrate his 14th birthday...gosh, it just doesn't seem possible.  All three love Angry Birds, so I am making each one a themed birthday card.  I found this one here
The base is a 5x6.5" white card with layers of decorative paper from Around the Block and Whisper White.  I stitched around the edges in a wonky curvy path.  The sentiment (from a Michael's dollar stamp set) is stamped on Whisper White and the notch punched with the 1 3/8" square punch.  I wrapped some Cherry Cobbler baker's twine around the end & secured with a little tape on the back before attaching it to the card.  The Angry Bird directions are on the link above.  I did have to make a few tweeks, since I did not have the bracket die or the five-petal flower, so I used the word windo punch from SU and the bow from the present of Cricut's Doodlecharms (set at 3").  I mounted the top beak with dimensionals, as well as the finished bird.  Thanks for looking!  April

Sunday, May 15, 2011

Birthday coupon book


My daughter's BFF is having a birthday and she wanted a little something to add to her gift, so I sat down at the computer and helped her come up with some coupons for things to do together. (My daughter hates Justin Bieber, but made a concession to watch the movie with her friend...too cute!)


Once I printed the coupons, I trimed them to 3 1/2x5 1/2. The cover was then cut at 3 3/4x11 1/2. Fold the cover in half. (Here I used Taken with Teal.) I used Versamark on the cover with the Grunge Rock stamp set. Adding rhinstones as accents. I then made the scalloped circle layered with Taken with Teal and textured white cardstock and stamped with Taken with Teal craft ink. The cover was run through a crimper at the fold mark to make a binding. The coupons were perforated for easy removal, inked and stamped with various images. I put the coupons in the cover, then punched with a crop-a-dile, adding eyelets, then running ribbon through. Super easy! Thanks for looking! April
Sunday, February 13, 2011

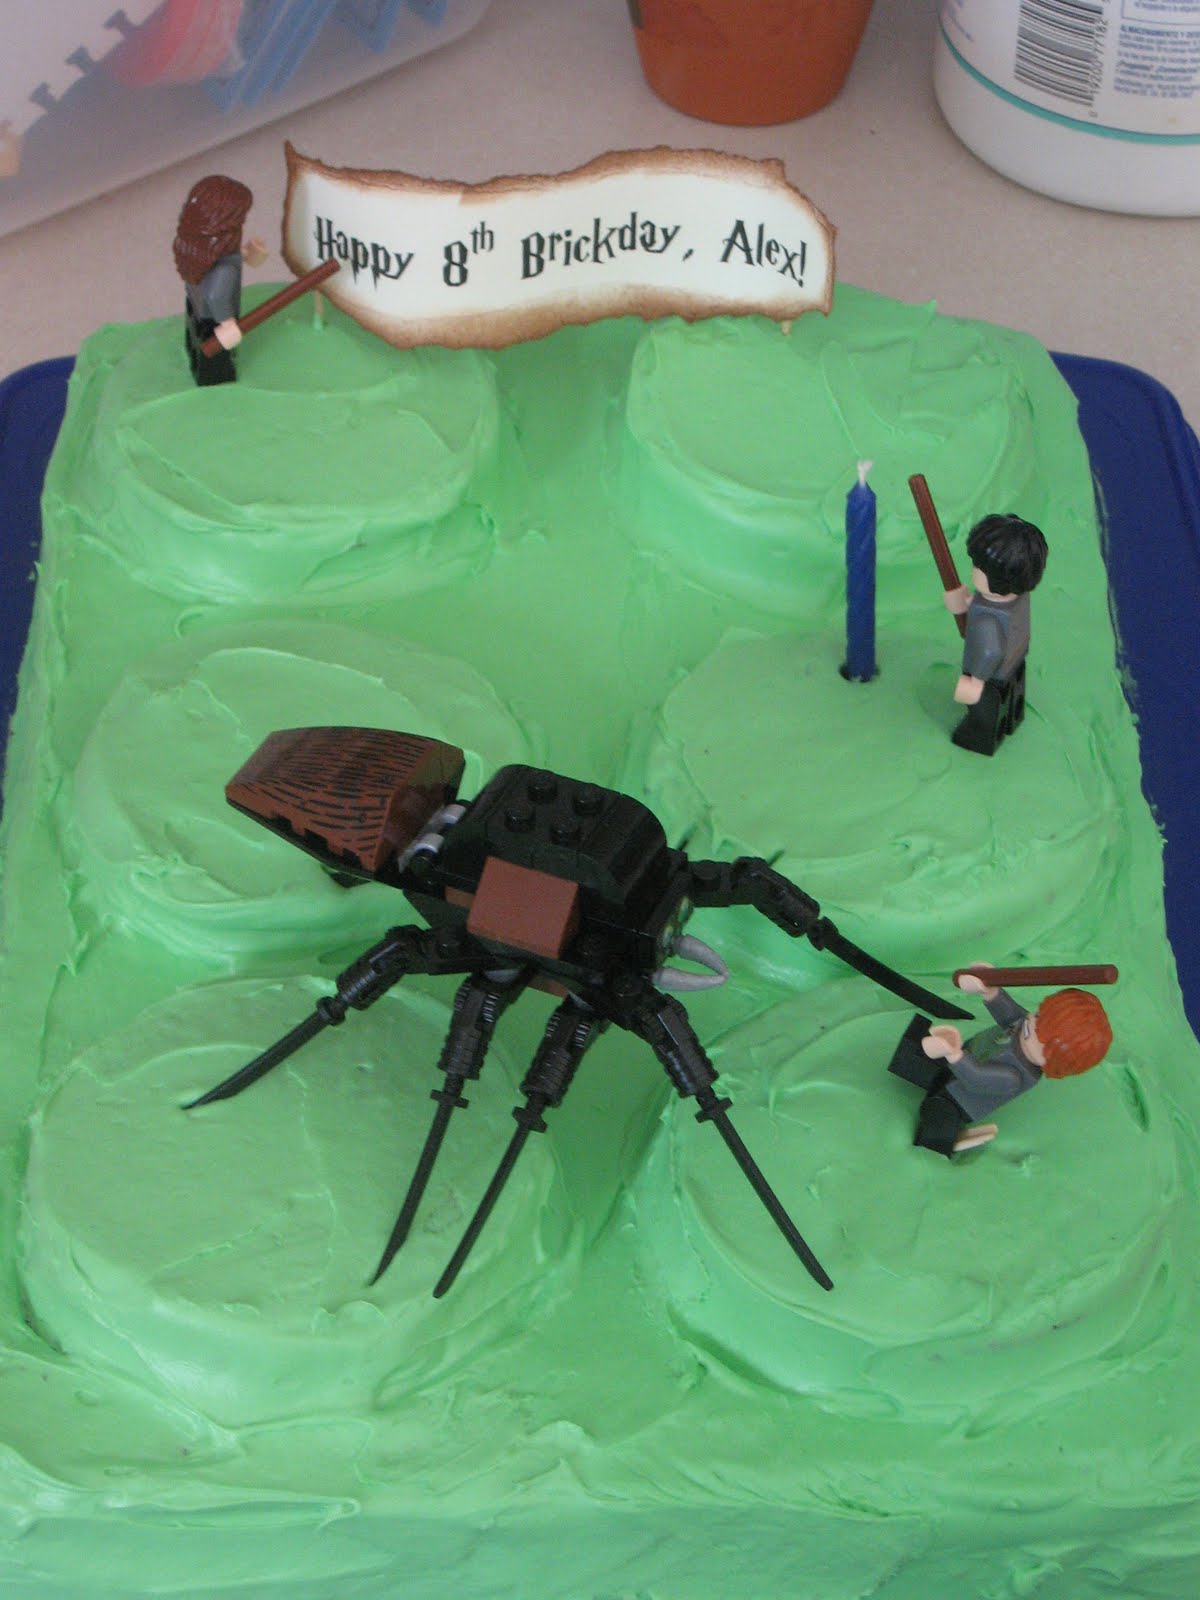
Lego Birthday cake

Here's my son's cake for his party today. The frosting was a pain the in bum, but it came out okay in the end. I used two boxes of cake mix to fill the 9x13, using the left overs for the circles. My daughter has the Easy-Bake oven, so I stole her round pans and baked them in the toaster oven for 12 minutes.
We used his Harry Potter legos and I made the banner using Harry P font from dafont.com and printed on Very Vanilla cardstock. I ripped the edges of the banner and used Chestnut Roan cat's eye chalk to make it look more like parchment. Next I pulled the paper between my fingers to make it curl like you do with ribbon, then attached it to toothpicks with Zots glue dots. Thanks for looking! April

Wednesday, February 2, 2011

Lego favor bags

One of my son's friends can't be at the party and was really bummed, so I thought I would put his goody in a special bag. Turned out so cute, Alex asked me to make them for all his friends. So here I sit with a square punch and little circle punch...you guessed it, hand-glueing little dots onto squares to make bricks. Geez, the things we do for our munchkins.
I had a few left over mini paper lunch bags and used scraps for the pieces. I used the 1 3/8 inch square from Stampin Up/EK Success and the EK Bubble border punch to get the right size circle. I mounted one lego brick at an angle, then put the second "brick" on dimensionals and tiltled it the opposite direction. I then layered two squares to make their tags and stapled to the bag with a bit of leftover ribbon from my stash. They will make cute placeholders on the table and will be our activity. Each boy has a mini lego kit to take home. Thanks for looking! April

Sunday, January 30, 2011

Lego Birthday invitations

So my son is having a Lego-themed birthday party. I decided to look for ideas for party ideas online and found a suggestion for invites. They were more basic - simply standard cards that had the lego words printed across the front a few times to sort of look like the brick. Of course, I have to take it a step further...nothing like feeling competitive and one-upping it, right?
So, I chose a primary cardstock and sat down at the computer. First I printed the "Lego" using three columns and Bauhaus93 font (it was the closest I could get to it's icon). I think it was 36pt and returned twice between, to leave enough room for a circle punch. I fit 15 on a sheet and utilized the shadow and outline options in the format. Next, I set up the info four to a sheet and using two columns.

Once it was all printed, I cut them apart, postcard style...they are the size of an A2 card front (4.25x5.5). Set aside. I used a 1 1/4 inch circle punch to make the LEGO circles. I then used Stampin Up's Summer Sun and Only Orange to ink the pieces (both retired colors). Next come the dimensional on the back of each circle and mount three down and two across. How cute is that? My son is doing a happy dance about his lego block invites.
Thanks for looking! April

Saturday, October 9, 2010

Build-A-Bear Birthday Invites


So we are taking our youngest to BABW for his birthday, along with his preschool friends. Yea, the invites you can pull for the Build-A-Bear are okay, but I wanted something more.

The base is Bo Bunny Back to Basics cardstock. They are cut roughly 6x5 1/4 and I used the Stampin Up scalloped border punch on the bottom. I chose it because it is double sided. It is the same color but one side is polka dot and the other is kind a marbled look. I found a BABW icon, then sized it in a wordprocessing program. I printed the info in a separate document on vellum. Next I stacked the BABW icon and party info and attached them to the base with a tiny bit of adhesive to keep it in place until I got the invites punched and eyelets placed. I used 3/16" eyelets and tied with Night of Navy ribbon. Last, I punched 1 1/4" circles from white cardstock and punched 5/8" holes in that. I wrote the name of the invited child on the circle and attached to the ribbon with a safety pin. Simple but cute! Thanks for looking! April

Sunday, July 6, 2008

Wall-E cookies...

Well, you can tell it has been over two years since I have done color flow! I haven't messed with it since taking the Wilton class before the youngest was born, so I really had to read over the directions a dozen times and practice. I forgot how super fast the stuff sets up, but they still turned out super cute. Alex is thrilled. He went over the moon with the tags for each cookie.


I promise I will be back to normal eventually. I still have 8x8 LO's to make for a swap, then I will be out of commission for awhile. I may stick to simple cards or take a break all together. I am still waiting on the doctor to call with the appointment for the neurologist for my hands...at this rate, who knows how long it will take. Thanks for looking! April