Showing posts with label Disney. Show all posts
Wednesday, February 24, 2021
Monorail Room Decor
My youngest is all about Disney, especially Mickey and anything to do with the parks. He has special needs and making choices like decorating his room is a big deal. When I showed him the monorail from Designs by Miss Mandee, he was thrilled. He already has a banner he made over his bed, so I asked if he wanted monorail trains around the top of his room. He was so excited picking each color for the striped and I resized them for the wall. The end cars ended up
being 11.5 inches long. I had to tweak the design so I could layer the black windows on top, rather than cut whole black cars. Because they were so big, we didn't bother with transfer tape and just peeled and placed like regular stickers. The walls are not smooth so it took a bit of work to get them to adhere but they are fabulous! Thanks for looking! April
Labels:
Cricut,
Disney,
home decor,
vinyl
Monday, February 1, 2021
Santa Mickey wall hanger
I had this jpeg image for a while now. I planned to make cards or put it on something as vinyl but came up with this. I cut the base of each five times and glued them together to give it some sturdiness and keep it from curling. The letters are cut from green polka dot Bazzill and the hat is red and glitter white. I added hangers to the back and used removable Command hooks to hang. Can you tell my teen son did the hangig because he is taller? I may consider remaking this in basewood later on. Thanks for looking! April
Labels:
Christmas,
Cricut,
Disney,
holiday,
home decor
Thursday, January 28, 2021
Peppermint Mickey Garland
I decided I wanted a garland for over the fireplace after finding some amazing inspiration on IG and Pinterest. So, off to the Cricut I go! This was made with white glitter cardstock and red and green Cricut brand shimmer papers. I used Tombow Aqua adhesive and it worked well. I used a light weight on top to help set as I glued the next one. I got inspiration from Tara at Wilder Crafting on IG for the hanger design. It is basically a strip of paper with a hole on each end to run the string through, allowing the ears to look like they are floating. I just used jute twine to string them up. Thanks for looking! April
Labels:
Christmas,
Cricut,
Disney,
holiday,
home decor,
paper craft
Tuesday, January 12, 2021
Wish Big card
I love my Queen and Co Magical shaker dies but so rarely get to use them. My sis in law loves Disney too so I knew this was the perfect card for her. I used a base of Whisper White and layered a piece of the QandCo coordinating paper. I cut the BIG from matching paper using the MFT Big Birthday Wishes die. The Wish is cut from MFT Starry Night in Blueberry Bushel and white heat embossed. The hat is also Blueberry Bushel and filled with Moon and Stars confetti I found at JoAnn in their value bin. Last, I added some sequins and confetti Mickey heads from a mix found at Tuesday Morning. Thanks for looking! April
Thursday, January 7, 2021
Mickey Valentine Garland
I loved my Peppermint garland so much, I decided to make a Mickey Conversation Heart Garland too! I used Cricut Design Space to cut the words out of the Mickeys, as well as the red glitter backs. I used the same process as the pepper hangers. I am already thinking of ideas for Easter. Thanks for looking! April
Labels:
Cricut,
Disney,
holiday,
home decor,
Valentine's
Thursday, June 4, 2020
Disney Castle color-change tumblers
I have been playing with ideas for my craft fair booth and wanted to try some samples of vinyl I received in the mail, so these new color-changing tumblers from Michael's were the perfect opportunity to play. I used silver rain holographic vinyl for the fireworks and Minnie's bow, and glitter rainbow vinyl for the castles. I love the effect of the holographic vinyl. Now, I have to put these through their paces and see how it holds up to washing. Thanks for looking! April
Labels:
craft fair,
Disney,
gift,
vinyl
Wednesday, December 4, 2019
Maleficent coffee cup
I saw this great svg on Pinterest and couldn't resist since we are all Disney fans in this house. I found the cup in the $1.99 bin at Michael's and used permanent vinyl. I had a little issue with the super skinny lines behind Maleficent, but it seems okay without them. I will be sure to show off my reindeer one next. Thanks for looking! April
Tuesday, November 5, 2019
Baymax First Aid Kit
Our youngest received this cute first aid box from a local children's hospital and it was pretty boring with a sticker on the front. I promised I would make his own special kit. I found a cute Baymax image and imported it into Cricut Design Space, using contour to fill in the image. I also made the title, cutting it all in vinyl. I found the pain scale and used the print and cut feature after adding Baymax's quote. I laminated the pain scale before gluing it inside the lid. Thanks for looking! April
![]() |
| Inside kit |
Labels:
Cricut,
Disney,
kids crafts,
vinyl
Thursday, October 10, 2019
Donald Duck shaker card
My MIL loves all things Donald Duck so for her birthday, I couldn't resist recreating this card from Queen and Co. It was a snap using the dies and papers from the company and I love them so much I can't wait to order another set. I used seed beads I got from JoAnn to fill the shaker. Thanks for looking! April
Friday, September 20, 2019
Donald Duck card
This is a card from Queen and Company's Magical Characters shaker die kit. I chose not to make a shaker and just use the iconic Donald Duck sailor hat. This card was fast and easy to put together. I do recommend using an adhesive sheet on the back of the cardstock before cutting to make it easier to piece together. I used the retired Stampin Up bow builder punch for Donald's bow. Add a couple of buttons and some white gel pen details and there you have it. Thanks for looking! April
Labels:
Disney,
kids birthday,
QandCo,
Stampin' Up
Wednesday, September 18, 2019
Mickey subway art
This second subway art canvas was made for my youngest. He is a huge Mickey fan and I wanted something to put over his desk. It uses images found on the internet, as well as the Mickey font Cricut cartridge. Again, I used the Jennifer Maker tutorial to create the canvas. Thanks for looking! April
Labels:
Cricut,
Disney,
home decor,
kids gift
Friday, June 21, 2019
Newsies Subway Canvas
I recently watched a great tutorial at JenniferMaker where she made subway art with vinyl on canvas. I was inspired to make a canvas for my son. He recently played Darcy and an extra newsie in his high school production of Newsies. I found images online and mixed various fonts to create this. He was thrilled with it and mentioned having one made for each of the school plays he participates in.
I will be honest, even using the permanent vinyl, it was hard to get it to stick. I used Cricut and Oracal 651. The Cricut brand was much easier to weed and remove the backing. The Oracal brand has a stiffer backing and it would flake apart, leaving a very thin plastic-like layer behind that was a pain to remove.
I have read about prepping the canvas with mod podge, gesso, or acrylic paint. I think these would help and will be trying this in the future. I will let you know how it works out. Thanks for looking! April
I will be honest, even using the permanent vinyl, it was hard to get it to stick. I used Cricut and Oracal 651. The Cricut brand was much easier to weed and remove the backing. The Oracal brand has a stiffer backing and it would flake apart, leaving a very thin plastic-like layer behind that was a pain to remove.
I have read about prepping the canvas with mod podge, gesso, or acrylic paint. I think these would help and will be trying this in the future. I will let you know how it works out. Thanks for looking! April
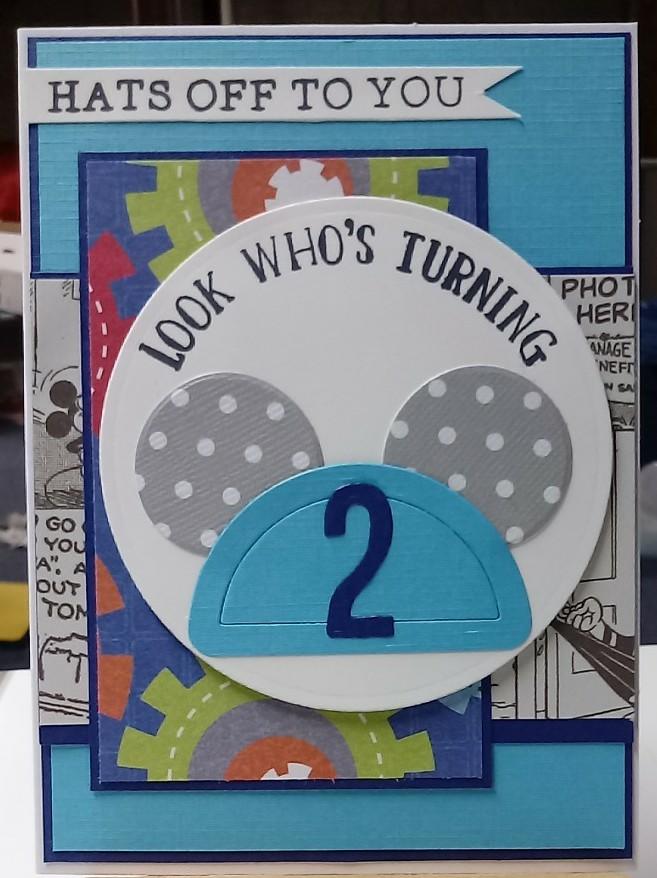
Monday, June 3, 2019
Hats Off
Labels:
birthday,
Disney,
kids birthday,
Q & Co
Monday, December 24, 2018
Disney Orange Bird Purse DIY
We are huge Disney fans in this family and we each have favorite characters. My oldest likes the Orange Bird and has been collecting the Disney Trading Pins. I thought she would like a small purse for running around the parks, but the one on Disneystore.com is a whopping $65! I found this tutorial on As the Bunny Hops via Pinterest and it's cost was $19 for the purse (Amazon) and pennies in vinyl. What a great gift!
Amy at As the Bunny Hops was kind enough to put up her Studio file, but it wasn't easy to move the file to Design Studio. I finally found an online converter that seemed to do the trick and I had to play around to get the image through contour so I could have all the layers.
I started with the inside of the beak (cut in brown vinyl), then the full beak (yellow). The image shows up a tad wonky in DS, showing just the lines around the inner mouth and no way to fill it so I cut the full mouth and just weeded the outer beak. It wasn't too much vinyl (less than a 2x2" square). Next I contoured the eyes. I started out doing the larger part by contouring all three parts of the eye as one group so I can weed the pupil out. (I ended up layering the white and black, but fixed that after the fact in DS, so the next time I cut it they will nest.) Last I contoured the pupil and brows.
Once I figured out how the contour worked, I placed all the pieces back together like a puzzle and grouped them. When you hit the Make button, it splits all the colors into separate mats. To make it easier to put together, I used the Write function to make a scale base to build on. I taped the picture to a light box, then taped each layer over the image as I worked. I picked up the black cut first, taped the white to the picture and used the image to place the pupils in the right position. Be careful not to let the vinyl touch the paper! Once the eyes were together, I used tweezers to put the inner mouth on the beak, then taped the completed beak in place over the image and repeated my steps to pic up the mouth. Last, place on purse and rub!
I am waffling about whether to paint the leaf a lighter green like Amy did. I don't think it looks too bad and the more vintage pics show a bit darker green so I am thinking I will leave it. I will say, I am looking to replace the chain strap that came with the purse, so it's off to the craft store.
Thanks for looking! April
Amy at As the Bunny Hops was kind enough to put up her Studio file, but it wasn't easy to move the file to Design Studio. I finally found an online converter that seemed to do the trick and I had to play around to get the image through contour so I could have all the layers.
I started with the inside of the beak (cut in brown vinyl), then the full beak (yellow). The image shows up a tad wonky in DS, showing just the lines around the inner mouth and no way to fill it so I cut the full mouth and just weeded the outer beak. It wasn't too much vinyl (less than a 2x2" square). Next I contoured the eyes. I started out doing the larger part by contouring all three parts of the eye as one group so I can weed the pupil out. (I ended up layering the white and black, but fixed that after the fact in DS, so the next time I cut it they will nest.) Last I contoured the pupil and brows.
Once I figured out how the contour worked, I placed all the pieces back together like a puzzle and grouped them. When you hit the Make button, it splits all the colors into separate mats. To make it easier to put together, I used the Write function to make a scale base to build on. I taped the picture to a light box, then taped each layer over the image as I worked. I picked up the black cut first, taped the white to the picture and used the image to place the pupils in the right position. Be careful not to let the vinyl touch the paper! Once the eyes were together, I used tweezers to put the inner mouth on the beak, then taped the completed beak in place over the image and repeated my steps to pic up the mouth. Last, place on purse and rub!
I am waffling about whether to paint the leaf a lighter green like Amy did. I don't think it looks too bad and the more vintage pics show a bit darker green so I am thinking I will leave it. I will say, I am looking to replace the chain strap that came with the purse, so it's off to the craft store.
Thanks for looking! April
Saturday, August 25, 2018
Disney Album
This adorable album was made from a tutorial by Ginger at MySistersScrapper. Be sure to see her videos on YouTube! The album is made from chipboard, kraft paper, note and envelopes from Hobby Lobby, and Simple Stories Say Cheese line. I wanted it to be a bit sturdier along the spine so I used duck cloth canvas in place of cardstock. It bends well and the double stick tape holds it in place. Ginger has the link to how to make the inner page binding as well.


Thanks for looking! April

Labels:
Disney,
paper craft,
Simple Stories
Sunday, June 3, 2018
Disney Autograph books
So we are getting ready for another trip to Disney. This time, we will be celebrating our daughter's graduation and she asked for autograph books for her and her friend. First up is a Merida inspired one from Brave. My daughter loves Brave and chose the knot design from the Cricut cartridge Believe in Dreams. I used kraft for the design and retired SU color Handsome Hunter for the background. I cut 40 of the background in Whisper White for her pages. Each 12x12 sheet cut four. TIP: note where the top of each piece is as it is NOT a symmetrical design!!! I laminated the covers and punched the hole with a crop-a-dile before binding with a ring.Next, I made a Sleeping Beauty inspired crown autograph book for her friend. I used gold-metallic paper. I had to tweak the Aurora crown in the Cricut cartridge by cutting off the two side points. I also added her name to the cover, using Cricut Craftroom and one of the calligraphy fonts options, only cut deep enough to score the name into the front. Because of the size, only two fit to a 12x12 page. I also laminated and punched holes to bind with rings. Last, I added some gemstones to the front cover.
Thanks for looking! April
Sunday, November 19, 2017
Christmas card 2017
This year's card got way more involved than I had planned but it turned out really cute, so I shouldn't complain. I saw a really cute window card on Pinterest that was way more detailed and involved than this but it inspired me to pull out the Disney Mistletoe die I had and put it to use.
The base is kraft stock that came with the base and envelopes and is larger than the A2 size. These are closer to 5x7. I left it plain because I was worried about it looking too busy. (I had embossed the test card and it really didn't let the rest of the image stand out.) The die is cut on Basic Black, then set aside while I cut the Cherry Cobbler frames with a Nestabilities die. (A SU/Sizzix Top Note Die would have also been awesome too, but I wanted a slightly longer and skinnier die). The vellum is stamped in Whisper White craft ink using the stars from SU's Holly Jolly Greetings. It took forever for these to set and they were still a bit tacky when I was assembling the cards the next day. I put the frame and vellum together then laid it over the die cut. I
had to do a bit of trimming the remove the zig zag edges of the die cut
that peeked through the vellum.
The sentiment is stamped in Gumball Green on a 1 3/8" circle punch. I would usually pop it up on foam, but wanted to keep these very flat for mailing. Inside the sentiment is from a retired SU Paper Pumpkin kit from a couple years back, also in Gumball Green. 50 cards in just over 6 hours, minus drying craft ink overnight.
I gotta admit, it took me over two hours to cut the frames and die cuts alone. Oh, how the Cricut machine would have cut that time down! I will probably keep it much simpler next year.
Thanks for looking and Happy Holidays! April
The base is kraft stock that came with the base and envelopes and is larger than the A2 size. These are closer to 5x7. I left it plain because I was worried about it looking too busy. (I had embossed the test card and it really didn't let the rest of the image stand out.) The die is cut on Basic Black, then set aside while I cut the Cherry Cobbler frames with a Nestabilities die. (A SU/Sizzix Top Note Die would have also been awesome too, but I wanted a slightly longer and skinnier die). The vellum is stamped in Whisper White craft ink using the stars from SU's Holly Jolly Greetings. It took forever for these to set and they were still a bit tacky when I was assembling the cards the next day. I put the frame and vellum together then laid it over the die cut. I
had to do a bit of trimming the remove the zig zag edges of the die cut
that peeked through the vellum. The sentiment is stamped in Gumball Green on a 1 3/8" circle punch. I would usually pop it up on foam, but wanted to keep these very flat for mailing. Inside the sentiment is from a retired SU Paper Pumpkin kit from a couple years back, also in Gumball Green. 50 cards in just over 6 hours, minus drying craft ink overnight.
I gotta admit, it took me over two hours to cut the frames and die cuts alone. Oh, how the Cricut machine would have cut that time down! I will probably keep it much simpler next year.
Thanks for looking and Happy Holidays! April
Labels:
card,
Christmas,
Disney,
Stampin' Up
Sunday, October 29, 2017
Mickey Pumpkin
So we totally got screwed out of going to Disney thanks to Hurricane Irma. I wanted something to perk up the mood because hubs and I were really bummed. I had a fake pumpkin stashed in the Halloween box and have been wanting to try carving the foam and see if it is easier than a real pumpkin. What to put on it? Mickey, of course! I found these small "ears" at Walmart for under $1 each and I had the pattern in one of the old kids books. I realize I should have blown it up a bit more, but it worked okay. I used a push pin to mark the pattern then an craft knife to cut. I finished up by using some small craft files. The foam was really messy and stuck to everything but it was easier, and less gooey, than the real deal. The ears are attached with wood skewers. I also cut a hole in the bottom, just big enough for a battery operated tea-light to fit. Too cute to spook!
Thanks for looking! April
Sunday, September 10, 2017
Pixar Up mailbox tote
My hubby and I are going to Mickey's Not So Scary Halloween Party at Walt Disney World. We are dressing as grown up Carl and Ellie from Pixar's Up. I wanted to have a cute tote and found this little chipboard mailbox at Hobby Lobby. My talented teen painted the mailbox by hand. I punched holes in the top and added a braided cord handle. There are also hand-made Ellie Badges, tucked inside, to hand out during the party. Thanks for looking! April
Thursday, August 3, 2017
Our Adventure Book autograph album
Hubby and I are celebrating our 20th wedding anniversary at Disney. I am excited to be attending Mickey's Not So Scary Halloween Party and we will be dressing as Pixar Up's Carl and Ellie. Of course, our autograph book needed to match our costumes, so I made an Adventure Book from some leftover chipboard from a couple of Paper Pumpkin Kits and a Tim Holtz ring binder spine I found on clearance at Hobby Lobby.
I used faux leather from Cricut to wrap the covers, then used red duck cloth as my binding. I reinforced it with a scrap from a USPS priority envelope made of flexible TYVEK. I used E-600 spray and gel. I will say, the spray is in a pump and is really thin. Patience is key. I also learned it will seep through the faux leather and cloth. I found the gel, in a very thin layer, set much faster. Be sure to use a brayer to work out any bubbles.
The title was found online, printed and cut. Once attached, I used liquid glass to seal the ink, in case it rains. I used a gold sharpie to make the frame. The globe was also found online and I used a small piece of Stampin Up washi tape. The Ellie badge is made with a flat bottlecap and image was found on Pinterest. The spine is large eyelets and parachute lacing.
I used Cricut vintage Mickey and Minnie paper for the pages. I also used a punch to punch some of the pages and a sharpie to fill in the image.
I also found some wonderful free autograph printables from Britt-ish Studios and on Pinterest.
I used a Greeting Farm stamp from Sitting Casual and an image from google for the chairs.
I will add instant pics and ephemera during the trip. Thanks for looking! April
I used faux leather from Cricut to wrap the covers, then used red duck cloth as my binding. I reinforced it with a scrap from a USPS priority envelope made of flexible TYVEK. I used E-600 spray and gel. I will say, the spray is in a pump and is really thin. Patience is key. I also learned it will seep through the faux leather and cloth. I found the gel, in a very thin layer, set much faster. Be sure to use a brayer to work out any bubbles.
The title was found online, printed and cut. Once attached, I used liquid glass to seal the ink, in case it rains. I used a gold sharpie to make the frame. The globe was also found online and I used a small piece of Stampin Up washi tape. The Ellie badge is made with a flat bottlecap and image was found on Pinterest. The spine is large eyelets and parachute lacing.
![]() |
| Inside book |
![]() |
| autograph pages |
![]() |
| Last page - Carl & Ellie's chairs |
I will add instant pics and ephemera during the trip. Thanks for looking! April
Subscribe to:
Posts (Atom)