 More extras from July 2015 Thanks a Latte My Paper Pumpkin kit. Inspiration for the card from Pinterest. The base is bulk cards with layers of kraft and papers from SN@P. The matching SU colors are Red Riding Hood and Baja Breeze. I also used left over sequins from February 2016 Hello Sunshine kit and jute twine from a past kit. I don't get to play with my crimping tool often enough and forget the great texture it adds. This card was also a great way to use up some of the many, many extra glue dots and dimensionals often found in the kits. Thanks for looking! April
Thursday, March 31, 2016
Latte Paper Pumpkin extra
More extras from July 2015 Thanks a Latte My Paper Pumpkin kit. Inspiration for the card from Pinterest. The base is bulk cards with layers of kraft and papers from SN@P. The matching SU colors are Red Riding Hood and Baja Breeze. I also used left over sequins from February 2016 Hello Sunshine kit and jute twine from a past kit. I don't get to play with my crimping tool often enough and forget the great texture it adds. This card was also a great way to use up some of the many, many extra glue dots and dimensionals often found in the kits. Thanks for looking! April
Monday, March 28, 2016
Sunny Paper Pumpkin extra
 Here is the next card featuring My Paper Pumpkin parts. Inspiration came from here. I used the bulk card base and stamps from February 2015 Layers of Gratitude (inked in Daffodil Delight) and February 2016 Hello Sunshine (inked in Versamark and black embossing powder). I kept these in a single layer for easy mailing but used the embossing for a little texture. These were so fast to make that I completed 10 cards in under 15 minutes. Thanks for looking! April
Saturday, March 26, 2016
My Paper Pumpkin extras
I love finding the monthly Stampin' Up subscription for My Paper Pumpkin in my mailbox. Even if I am not totally sold on some of the monthly projects, I love the supplies. I normally find there are plenty of "spare parts" to make some extras. Since our move, I only have the kitchen table to work at, so I tend to let the kits stack up for a bit then binge craft. I was in desperate need of a restock of cards, so out comes the box holding several kits. Since you can see the basic kit all over the web, I will feature the extras over the next few posts. So, away we go...
 I will admit, I am cheap. While I love the quality of Stampin' Up cardstock, I love to buy bulk card base kits, especially for holiday cards. They are a bit lighter weight, which is nice for postage, but the color is a bit different. However, when you can get 50 cards and envelopes for $3.50, you deal with it. The design is based on a card on Pinterst, found here. This card base is from that bulk stock. I used left overs pieces from the October 2014 Sweet as Pie kit and August 2014 Seriously Amazing, and stamps from February 2015 Layers of Gratitude inked in Night of Navy, Marina Mist, Bashful Blue and Soft Sky. I stamped the envelope flap in the same pattern to match. It took less than 30 minutes to make a stack of these and I still have some feathers left. Thanks for looking! April
 I will admit, I am cheap. While I love the quality of Stampin' Up cardstock, I love to buy bulk card base kits, especially for holiday cards. They are a bit lighter weight, which is nice for postage, but the color is a bit different. However, when you can get 50 cards and envelopes for $3.50, you deal with it. The design is based on a card on Pinterst, found here. This card base is from that bulk stock. I used left overs pieces from the October 2014 Sweet as Pie kit and August 2014 Seriously Amazing, and stamps from February 2015 Layers of Gratitude inked in Night of Navy, Marina Mist, Bashful Blue and Soft Sky. I stamped the envelope flap in the same pattern to match. It took less than 30 minutes to make a stack of these and I still have some feathers left. Thanks for looking! April
Monday, March 14, 2016
Tinkerbell shirt
You are going to see a lot of shirts over the next few weeks, as we prep for our summer trip to Disney. My bestie loves Tinkerbell and purple. She is overrun with boys in her home, so something this girly is few and far between.
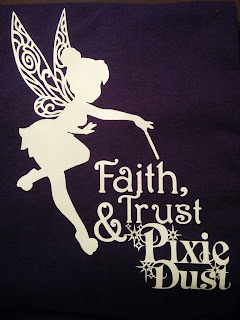 I made this in Cricut Craft Room using the Tinkerbell and Friends (Tink fillagree and "Pixie Dust") and Nursery Rhymes ("faith, trust &") cartridges. Instead of having to cut each part and try to line them up during the ironing process, I put everything onto one mat and, after selecting the entire image, flipped it right in the program. It cut the whole thing on a 12x12 sheet of vinyl. It took a lot of work to weed out the wings and the sparkles but it was gorgeous, and turned out beautifully. I can't wait to send it to her and will absolutely demand a pic of her wearing it. I am not sure if there is still sharing on the Craft Room designs or if it is only sharing in Design Space now, but let me know if anyone is interested, and I will be happy to try sharing it.
UPDATE: I have been asked for this file so many times. I have tried to transfer it to Design Space, now that CCR no longer works. I had no luck, so I decided to recreate it in Cricut Design Space. Here is the link to the public file. Hope you can access it here and enjoy!
Thanks for looking! April
 I made this in Cricut Craft Room using the Tinkerbell and Friends (Tink fillagree and "Pixie Dust") and Nursery Rhymes ("faith, trust &") cartridges. Instead of having to cut each part and try to line them up during the ironing process, I put everything onto one mat and, after selecting the entire image, flipped it right in the program. It cut the whole thing on a 12x12 sheet of vinyl. It took a lot of work to weed out the wings and the sparkles but it was gorgeous, and turned out beautifully. I can't wait to send it to her and will absolutely demand a pic of her wearing it. I am not sure if there is still sharing on the Craft Room designs or if it is only sharing in Design Space now, but let me know if anyone is interested, and I will be happy to try sharing it.
 UPDATE: I have been asked for this file so many times. I have tried to transfer it to Design Space, now that CCR no longer works. I had no luck, so I decided to recreate it in Cricut Design Space. Here is the link to the public file. Hope you can access it here and enjoy!
Thanks for looking! April
Thursday, March 10, 2016
Wall-E shirts
So we are finally heading back to the Disney World parks for the first time in six years. I am so excited, as our youngest had just started walking last time. He has come so far over the last couple of years and he can really appreciate the trip this time. I am making each family member shirts. (Look for our family shirts is a coming post.)
My boys asked for a couple extra shirts, and when Michael's puts the shirts on for $1.99, how can I resist?
My sweet hubby treated me to an upgrade on my Cricut, so I now have the Expression. I know, it's not the newest or most advanced, but I still prefer having the keyboard. (The new Explore requires computer access to use.) NOTE: The Expression will not work with Cricut's Design Space, but still works with Cricut Craft Room. I have found it is much more user-friendly than the old Design Studio on CD. It will link to a gypsy but a word of caution, once you link a cartridge, it cannot be linked to any other Cricut device. If you need to reassign your cartridges to Craft Room or Design Space, you will need to contact Cricut and have them manually moved by one of the Customer Service members.
Without further delay, here is Wall-E! I did not have enough vinyl to make a large character, so I used scraps. I used the Wall-E icon from the Best of Pixar cartridge. It cuts a large rectangle with curved corners, but I weeded out the oval and used the lettering. I was so excited about my idea, I forgot to flip the image! Not wanting to waste the vinyl, I came up with an alternative....mirror images! I used the last of my scraps to cut the icon (flipped this time!) and cut a tiny 2 inch Wall-E silhouette. Cricut has a helpful little chart online with how to kiss cut and popular placements on different clothes. I put the Wall-E icon up the right side of the shirt, with the red dot up by the shoulder. I used the oops cut on the back in the same spot, so when you hold up the shirt, they match up. I placed the little Wall-E cut near the collar on the back yoke. It came out so cute and my 13 year old thinks it's sporty. Thanks for looking! April
My boys asked for a couple extra shirts, and when Michael's puts the shirts on for $1.99, how can I resist?
My sweet hubby treated me to an upgrade on my Cricut, so I now have the Expression. I know, it's not the newest or most advanced, but I still prefer having the keyboard. (The new Explore requires computer access to use.) NOTE: The Expression will not work with Cricut's Design Space, but still works with Cricut Craft Room. I have found it is much more user-friendly than the old Design Studio on CD. It will link to a gypsy but a word of caution, once you link a cartridge, it cannot be linked to any other Cricut device. If you need to reassign your cartridges to Craft Room or Design Space, you will need to contact Cricut and have them manually moved by one of the Customer Service members.
 |
| front of shirt |
 |
| back of shirt |
Wednesday, March 9, 2016
Playing catch up again...
Since the move, I have not been doing much crafting...mostly the monthly Paper Pumpkin subscriptions. However, I have been taking photos, just not blogging. These are the cards I made as part of this years teacher gifts (emergency gift wrap kits).
 The base is Whisper White and I kept them pretty simple. The stamps are Stampin Up's Holly Jolly Greetings and inked in Smoky Slate, Bermuda Bay and Night of Navy. Simple layered stamping technique. For those of you new to stamping, always work layers from the lightest color up to dark. Thanks for looking! April
 The base is Whisper White and I kept them pretty simple. The stamps are Stampin Up's Holly Jolly Greetings and inked in Smoky Slate, Bermuda Bay and Night of Navy. Simple layered stamping technique. For those of you new to stamping, always work layers from the lightest color up to dark. Thanks for looking! April
Subscribe to:
Posts (Atom)