Tuesday, April 22, 2008

My newest creation...


This is one of my favorites...I was desperately searching for a way to salvage a blurry photo and this was the idea. "Growing at Twice the Speed of Life" is the title and I used papers that didn't have much to do with speed so the the photo was the central focus of the layout. It is amazing what you can do with some time and practice....give it a try for yourself!

clear mini beads...

Update: I am submitting this as one of my best shimmer works for the Stamp Something Challenge. I know I did it before Stamp Something was started, but I can't resist it...it is one of my favs and shows more of my creative side. Hope you like it...
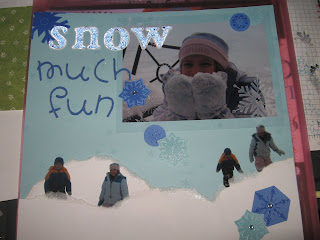
I have never played with glueing beads on a layout before, but it has a great effect...don't you think? It gives it a beautiful shimmery effect. Here's how I did it...First, cut desired word and shadow. Next take the letters and run them right side down through a Xyron sticker maker. It makes to top of the letters tacky. Peel and dip in beads. Brush off excess and put glue on back of letters, mounting to shadow layer.
The photo is stamped with white Staz-On on an acitate overlay (in plain english, it's an overhead projector plastic).
The snowflakes are stamped in Versamark on coordinating cardstock then heat embossed with clear or glitter powders. Simple crystal brads add a finishing touch. Thanks for looking! April

Reflections...


This is the first use of the new CTMH Reflections book...I like the new layout system it offers! You have the flexibility to match 7-10 other pages to compliment each other. There are over 100 choices, so it is nearly impossible to get bored. I like Cherish, but now that I am comfortable with the format, I have found it to be somewhat dull....but an excellent resource for someone just getting their feet wet.

Liquid Glass...


This is my first use of liquid glass. I stamped the title, then added the liquid glass over the top. You will have to click on the photo to get a closer look at the title. Once dried, it gives a shiny, raised finish. It also goes by the name Diamond Glaze or Crystal Effects. I like the effect, but you have to be careful what you try to use it on...I have had some trouble using it on small or detailed pieces. I haven't tried to mix it with colors or cracking it, but we'll have to see...

Trying eyelets


Here is my first stab at eyelets and twine! They are a lot of fun once you get the hang of them...if you are thinking about them, let me suggest that you play with a friends setter first. Setters can be cheap or expensive, depending on your preference. The cheaper ones are usually a hammer and setting tool and can be rather noisy. The more expensive option is the Crop-a-dile. I love mine, but it has a very limited reach...but it has two size settings and hole punches too. If you want to go ultra fancy, then the Crop-a-dile II is the way to go...at $50, it has a 6 inch reach. I finally broke down and got the automatic punch...a little noisy and you need to put some weight behind it, but it works well and comes with several different attachments. This page was done with the Crop-a-dile...

How do you pick a layout?


Sometimes it best to let the photos tell the story, other times, it just works to make whatever layout you create be the dominating element. This example is a really neat layout that I saw online and then received in one of those mail order offers. I wanted to showcase some of no.3's accomplishments (all the more precious because he has developmental delays), but I didn't want to have to make 5, 6, or 7 different layouts. This is a great way to showcase several stages and have a two page map of that first amazing year. You can pick and choose what milestones to feature, but I love the pebbles at the bottom. Even with a boy, you can alter the colors and accents to suit your needs. This was also my first stab at using stamps in the picture...(this one came before the Taekwondo page). I also showcased things like brads, and the Cricut...things I was really comfortable with using by the time I did this.

Taking chances sometimes pays off...


I was looking for a cool family tree for our third child. Sadly, most are pre-made and really old-fashioned, which is fine, but his book is mostly Disney so that would be really out of place. We are HUGE Disney fans and we spend many of our vacations at WDW or DLR. We had just been to the parks and we were awed by the "Tree of Life" so here is my inspiration! There are things I would change about it even now, but it really came out better than I had expected. I used a patterned brown paper for the base, then used a friend's Animal Kingdom cartridge to cut the animals in various sizes. I tried to find tails, trunks and smaller animals to make the branches and root areas. After that is just like putting together a puzzle. I used patterned green paper for the leaves from Doodlecharms, using varing sizes. I know there are no pictures, but it was the best way I could think of to still put in the traditional family tree with a modern, Disney-inspired twist!

Exploring ribbon and the Cricut...


Here is my first real project with the Cricut die cut machine. I made the Base Camp font into charms so I could try brads more uses for brads. This was also my first attempt at adding ribbon. What I have learned is that sticky ribbon...the ribbon that comes with adhesive on the back is a real pain...haven't used it since! It makes your tools sticky, is hard to punch through and once in place cannot be adjusted. I have since fallen in love with regular ribbon! Still, I see this page as a stepping stone and we only get better by exploring more mediums.

Something new...


I have just discovered chipboard so I am learning to play with it a little at a time. Here is my DS during a day in the snow...I'll show you a different version for DD later on. I used an ink pad to color the letters, then used watermark to put a snowflake over the "s," then dumped clear embossing glitter over that. It was sort of a failed experiment, but still came out neat. I have just started using embossing powder too...what I learned is that the blue ink needed more time to dry before I put the watermark ink on. The embossing powder came out lighter on the blue and heavier on the watermark. Sadly, when heated, it sort of melted all together, but still left a nice print underneath. Oh well, you never know until you try!

Branching out...


Here is another layout done from the Cherish book...this time the paper was made with their stamp set called "Just for Kicks." It is one of my favorites, simple but professional looking. Some added hints...I folded one corner to add interest and added brads...new to me at this stage. I also put brads arount the title...a die cut. I also utilized some of the goofy size pics you get in packs from the studio.

moving up...2004


Here are my first attempts at double matting. I shied away from using the cut out letters, partially because Sizzix limits you to the dies you buy and their sizes. I only owned two sets but they did not fit the size and font I needed. So...here they are. It is amazing how far the pages have come in 4 years...adding color, matting, etc makes a big difference. Remember, start small and try one new element at a time. Wait until you see the things I am still learning!

More 2003...


Here is another layout...I had just gotten my Sizzix die cut machine. This is my first try at using the lollipop font. DS is two months here and I am still rough with matting. Notice I am only using single matting and don't add much else.

First attempts...


Here are examples of how I started...Baby Face is basically done with a template and scissors. I tried to decorate it with marker and stickers, but it really doesn't stand off the page. Christmas one is one of my first attempts with color. I still had a need to cut everything out, but I was doing it to gain space. The idea was to fit as many pics in as possible rather than focusing on a few main pics of the event. The last page here is my first attempt at matting images. Again, I am still cut happy, but they are themed and I am slowly moving toward a better layout.

First Scrappings - 2000


Well, here is my first attempt at scrapping my DD's baby book...I didn't know anything about acid safe papers (I used the ones in the plastic sleeves!), or what products were available. I purchased a book and a pack of papers for 8.5x11 to run through the printer. I basically filled in the blanks and glued it in the larger pages, slapped a few pictures on it, maybe added a few stickers and that was it. I used deco scissors a lot and had an obsession with cutting all the pictures (butchering is more like it). Here is a couple of examples....