Saturday, November 22, 2008

Twilight...

OME (Oh My Edward!) I, too, have fallen for the fictional perfect man. Is it sick and wrong to be gushing about a fictional, mythicalogical creature? This torment is thanks to none other than the Stamp Vamp herself, Tanya Klar. Check out her blog Stamp Happens! I blew through the four books and Stephenie's draft of Midnight Sun in less than five days. I was so obsessed, I went to the midnight show! All I can say is Y-U-M!

Here is my little bit of mojo for the Twilighters. It is a tag book from Bare Elements. I made the pages on the computer, trimmed to fit, and embellished. There are tons of pages and I will post as many as I can, but here is a list of verses in the book...

1. When you live forever, what do you live for?
2. Twilight: giving hope to clumsy girls everywhere.
3. Stupid, shiny Volvo owner.
4. Edward prefers brunettes.
5. Yes, you are exactly my brand of heroin.
6. I'm betting on Alice.
7. If I could dream at all, it would be about you. And I'm not ashamed of it.
8. Take care of my heart - I've left it with you.
9. And so the lion fell in love with the lamb. What a stupid lamb. What a sick, masochistic lion.
10. I may not be human, but I am a man.
11. You are the only one who has ever touched my heart. It will always be yours.
12. Vampires play baseball?
13. Cullen Boys: because they don't make them like that anymore.
14. I'm with the vampires, of course.
15. One lifetime is simply not enough for me.
16. I promise to love you forever - every single day of forever.
17. Nothing more fun than a irritated grizzly bear.
18. I {heart} Edward Cullen.
19. Team Edward: Because we like our boys hard as stone.


Thanks for looking! April

Saturday, November 1, 2008

Why my Cricut ROCKS!


Here is Matthew's 2nd birthday cake. I used Mickey Font for the Clubhouse icon, George and Basic Shapes to make the Clubhouse base (trimming to get the shape), and Mickey and Friends for the characters. Don't you just love it? I think it is one of the best cakes I have made because the top was so easy and no frosting needed! Now, if I can salvage them, I will use them on his birthday LO. Too cool! Thanks for looking...April

Monday, October 27, 2008

I Want My Mummy!


Here is another CASE from Dannie's Designs. Don't you just love this sweet little mummy? I didn't have the lilac she used, so I just mounted them on regular white cards...I had to trim a little off the base to make it work. Colors are SU's Pumpkin Pie, Creamy Caramel, Very Vanilla, Whisper White and Basic Black. Directions can be found here. Cut strips following Dannie's directions, then sponge in Creamy Caramel. Punch eyes from Pumpkin Pie, Whisper White, and Basic Black. Assemble as in picture. Cut excess strips and sponge edges where strips were cut. Mount on Pumpkin and Black. So which is better, Frankie or Mummy? Thanks for looking! April

Thursday, October 23, 2008

Matt's Bday decos and cheap recycle


So I am cleaning up before the in-laws arrive and still stewing about Matt's birthday decorations...husband is on a penny-pinching streak. I don't need to buy the fancy printed stuff, but give me a little. I found cute Halloween themed plates with spiders, so I thought I would cut Mickey spiders for the cups. Of course, I don't have the DS yet, so I punched the Mickey icon from the Cricut vinyl and used a sharpie to make legs. I planned on purchasing the clear plastic cups so the punch would show through, but during my cleaning process, I found these yellow cups that were left over from my college grad party (almost 5 years ago!). We are not having a huge amount of people, so why not? I guess yellow could go for fall and Halloween, right? I am thinking about adding some inking, but I am not going to get carried away over a cup. Anyway, thanks for looking and I will try to post my other Halloween card I am working on during nap later today. T minus 6 hours before the in-laws arrive! April

Wednesday, October 22, 2008

More stationery boxes


Here is my last couple of boxes. I made these for my mom in law and Tony's grandmother for Christmas. I like the lighter colors. These papers are by Sixth Avenue and are available at Michael's. The base is Bazzill. Sentiments are from Michael's dollar bin or JoAnn's. Flower stamp from Stampin Up's Cause for a Celebration set. Leaf stamp from Mike's dollar bin. Colors are SU's Purely Pomagrante, So Saffron, Certainly Celery, Bashful Blue, Chocolate Chip, and Whisper White. Thanks for looking! April

Sunday, October 19, 2008

Two sets, Two looks

I finished the other stationery box and thought I would show you them side-by-side. I am a blue kinda person, so I like the second set better. The blue set is also My Mind's Eye Bohemia collection. It is just so yummy!

What do you think of the cards? I used the same elements on both cards, but in different ways. I like both and wanted to show you how the same embellishments can be used in a variety of ways. I also used an extra flower on the green card...I just stopped at step two. Don't the flowers match the Bohemia set beautifully? Thanks for looking! April

Saturday, October 18, 2008

Stationery Box

Here is my take on Dannie's Stationery Box Tutorial. I was able to make this after printing her templates and watching her wonderful step-by-step video. Dannie uses all SU, but I don't have much of the paper or money to keep it up. I was able to match some SU stuff into it. Colors are: Not Quite Navy, Brocade Blue, Garden Green, Chocolate Chip, Whisper White. I used SU inks and the paper for the top and some of the cards. The base of this box is Bassill because it has the same type of thickness as SU. Other papers are from Michael's and are called Bohemia by My Mind's Eye. They have a blue set that I plan on using for the next box, but all of it matches so beautifully. The first picture is of the standard cards and samples of the 3x3 card and tags.
The second is the complete kit. Inside the box is a place for standard A2 cards, 3x3 cards, tags, stamps, pen, etc. Dannie included a note pad, but I put a 2009 calendar in place of that.
Here it is all packed up for giving. I am really excited by the results and plan on making more for gifts this Christmas...can we say teacher gifts? Sorry the colors are a bit washed out. I will do better next time. Thanks for looking! April

Good Buy and Pretty Flower


Happy Saturday all! Okay, I admit, I stole this idea from Dannie at Dannie's Designs. Stampin Up offers a great five petal flower punch that she uses for this flower. While I don't have it, I found that Michael's carries a little bucket of Brides brand confetti flowers. They come in Ivory pearl or White pearl and cost $4.99 but I used a coupon and got it for less than $3. Each little flower has a little pearly sheen on them. I am working on coloring them and will let you know how that works out.


Each big flower is made from six little ones. The picture shows you what one flower looks like (top right), the bottom of the pic shows what the back looks like when it is assembled, and the the last is with the brad added and finished (top left). What you do is take two flowers and glue them together so the flower behind the top one shows the petals in between the top ones. Next, stack four more flowers and cut each petal to the center of the flower. Then glue each one behind the flower to fill in the gaps. The first two layers have five petals, the bottom two layers have ten petals each. I let them dry, then punched a hole for the gem brad. I will post pics when I finish what they are going to be used on. (I stole that idea from Dannie at Dannie's Designs!) Thanks for looking! April
Wednesday, October 15, 2008

Halloween Birthday


Here are Matt's goody bags...I found these so cute bags at Walmart for a quarter each. I saw the little ghost and knew he was perfect. All he needed was a pair of mouse ears! I used my Mickey sillouette punch to make the ears then used a little white gel pen to highlight. The name tags are made from a Michael's $1 bin stamp and I think they are just great. Colors are SU!'s Basic Black and Basic Gray. Some orange ribbon adds a finishing touch. So easy and festive!
I also used the tombstone for tags on pencils my daughter is giving her class. I just stamped, cut and tied on. Very cute!
Thanks for looking! April

Monday, October 6, 2008

Birthday - Mickey Mouse Clubhouse style


My youngest is monster-sized obsessed with Mickey Mouse Clubhouse. We did a Mickey theme last year, but his birthday falls right before Halloween, so we decided on a Clubhouse Halloween Birthday party. We are inviting everyone to wear their costumes and we are going to play Halloween games and such. Anyway, here is his invites. I inked the grassy background. I made the clubhouse from Mickey's punch and a 2 inch circle punch. I cut a small rectangle for the neck and used a marker to make the windows. Yes, I am missing the shoe garage, glove balloon, etc. The Mickey is made from an acrylic set from Inkadinkado. I stamped him on his many colors and cut out to make a paper piecing. His party hat and sentiment are Studio G. I added some Crystal Stickles to the hat. Colors are SU's Green Galore, Only Orange, Real Red, Summer Sun, Whisper White and Basic Black. Thanks for looking! April

Saturday, October 4, 2008

If it isn't one thing...


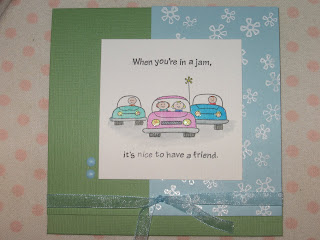
It's another. I have been asking DH for better than three weeks what he would like to do for his mom's birthday. She lives in another state, so we need enough time to send it. Of course, he says "I don't know" and "I'll think about it". So I continue to nag. Last night (nearly midnight) I try again...his mom's birthday is Tuesday after all. He finally says "Can't you make her something or buy her a Starbuck's card." One, she doesn't do Starbucks...too high end for her and she is a gas station coffee type of gal. Two, like I haven't been asking you for the last how many days??? So I spend my Friday night racing around trying to come up with something. I wanted to cut some fabric on the Cricut, but that didn't work too well. I also tried using a punch...no luck there eiter. So, bust out the buttons and away we go. Not my best work, but what do you want when it is 11pm and it needs to be in tomorrow's mail? No wonder why I don't get much scrap time in!!! Tomorrow, I WILL get to spend some time scrapping...I don't care what else happens. Anyway, here is the end result of my mother-in-law birthday gift adventure. And the moral to this story? Never leave it up to your husband to figure out a birthday gift! It will only cause you more stress in the long run. Thanks for looking! April
Friday, October 3, 2008

Midnight Snack


Here is a LO from 52 Sketches...52 Weeks. It is Week 39, in case anyone wants to see the sketch. This is my youngest eating pudding VERY late one night. He decided to get up and since he and dad were up...well, you get the idea. No wonder he likes to get up with dad! Of course, I had to have pictures! You have seen this paper on a couple of other LOs. I used the leftover scraps to make this. Paper is from Hobby Lobby. The brown cardstock is SU's Chocolate Chip. Fonts used are: "midnight" is Base Camp, "snack" is Mickey, and the bracket is from George and Basic Shapes. The scallop behind the clock is from Mini Monograms. I punched a circle and made a clock face that is chalked with Cat's eye chalk in Chestnut Roan. I was going to sew along it, but I honestly forgot.
Oh well, such is life...besides, I am trying to get caught up on the kids, so I can get to a Disney album that has been waiting since 2005! My husband will be thankful when that pile finally disappears from the table...LOL. Thanks for looking! April

Sunday, September 28, 2008

Hoppy Easter


I am finally getting around to finishing up some LOs I have been sitting on for awhile. Here is Matt's Easter LO inspired by one of the CTMH's Cherish book. It is hard to see in the photo, but the papers are zig zag stitched between the various papers. I stamped the date in SU's Tempting Turquoise and the Easter stamp in Only Orange on a metal-rimmed tag. Other colors are lime green and Brilliant Blue on a pale blue base. The title is done in rub-ons. I have just recently discovered the adorable scroll clips and attached it with ribbon. The ribbon at the top is tied around a small safety pin. That's about it! Thanks for looking...April

Friday, September 26, 2008

O-R-E-O & Stamp Something Challenge


What goes better with milk than an Oreo cookie? Here is my youngest with his first Oreo earlier this summer. The LO is from Sketches {by Tamara} #63. I am also submitting it for this week's Stamp Something challenge - Stamp Something! I printed out pics of Oreos I found at Yahoo images and adjusted the sizes in a word processor. Colors are SU Chocolate Chip for the base, Brilliant Blue, Real Red, and Whisper White. I stamped the title and accents from Autumn Leaves Scribble font in Real Red and Brilliant Blue. The SU tab punch was used with Real Red for the date and attached with two silver brads. I printed the journalling from the computer on acid free cardstock. The words in blue are cut out and mounted with pop dots. "Ice cold milk and an Oreo cookie. They forever go together for a classic combination. When a dark, delicious cookie meets an icy cold sensation. Like the creamy crunchy chocolate tasting O-R-E-O." What else can you say but YUM! Thanks for looking! April

Tuesday, September 23, 2008

You're Worth a Million!


Here is my first project since having my other carpal tunnel surgery. It is also my entry for this week's Stamp Something challenge. I got a couple of new sets from CTMH. This is called Little Treasures and comes with the jar, coins, jelly beans, fish, bugs, lollipop, candy, and more. I just love this set because it is very versatile. I stamped the jar on some recycled acetate (back of the acrylic stamp sets). Then I trimmed it and wrapped it with some ribbon...I did that so I could put glue on the ribbon so that it wouldn't show through the acetate. I stamped the coins on white cardstock and colored them grey. I tried using a silver marker, but it covered the coin too much. I did cut one out and put it on the corner of the jar to help anchor the plastic jar. I mounted it on Real Red SU cardstock and then stamped the sentiment with Real Red from SU's Bold Brights. Just a few small embellishments...photo anchor and some brads finish the look. Inside says: You're worth a million! Simple, yet cute. Thanks for looking! April

Saturday, September 6, 2008

Thinking of You

I needed to make two cards for officers in my fraternal organization, so here they are!

The leaf is from SU's Greetings Galore. Card background is from Sizzix mini paper packs for their machines. I cut the box at 3 inches, then the white at 2.5 inches. I stamped the white in Jet Black Staz-On, then stamped the image again using Forest Green Staz-On for the leaf then cut it out, mounting on pop dots. I inked the finished image base with Handsome Hunter from the Rich Regals color family of SU. I then attached the image to the leaves base and ran through my sewing machine with a straight stitch. I finished the stitch with a piece of tape on the back, but covered the front with buttons. I am not normally into monochromatics, but I think it is pretty handsome anyway. As always, thanks for looking and feedback is always appreciated! April

Sunday, August 31, 2008

Hot Challenge


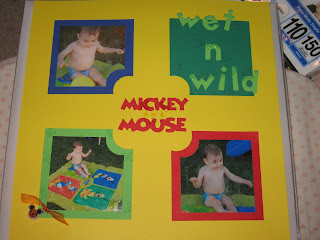
Here is another challenge LO. We were supposed to use yellow, red, and orange. I had just printed pics of Matt playing with is first sprinkler set...Mickey Mouse, of course! I decided it would be really fun to try to reproduce the sprinkler mat and here is the result! I used all SU Bold Bright colors...Yo Yo Yellow, Green Galore, Green Gable, Brilliant Blue, and Only Orange. The orange isn't really on the mat, but it seems like it fits in the scheme. The squares are cut at 4 inches and I used a 1.5 inch circle punch to clip the corners. Pictures are cut at 3.25 inches. I wanted to incorporate the characters into the design, so I stamped them in the matching color of the box. You can see from the picture that I substituted Minnie on the LO in place of Pluto. Font is Mickey Font from Cricut. I made the Mickey charm from Shrinky Dinks and a Mickey stamp with Jet Black Staz-On. I used VersaMark to stamp Mickey's face over this name then embossed it with clear emboss for a wet look. I also used liquid glass on the title letters to make them look wet as well. As always, thanks for looking! April

Friday, August 29, 2008

Black & White Challenge


Susie at White Ribbon Cards is doing a Black & White challenge in celebration of her wedding and blog. Here is my Happy Anniversary card...inside reads "Still fashionable after all these years." I made ones like this for a swap, but have changed it up a bit. On the left, I used Staz-On in Jet black. The right, uses Versamark and black embossing powder. I like the right one because the color is richer, but even with the embossing magic, it still left some embossing residue that makes it look like a black halo around the image. I have tried other images in black but still end up with the ugly mess. The red is Crayola water color. The image is matted on black cardstock and a simple clean red ribbon is added for a finishing touch. Thanks to Susie for the challenge! Thanks for looking...April
Update: Well, I didn't win the challenge, but that's okay...I have a couple new cards to use later. The winner made a card personalized for the bride and groom with their names and wedding date. Pop over and take a look.

Thursday, August 21, 2008

Wall-E paper piecing & LO


Well, I finally got around to doing some scrapping and I am really proud of myself! I found some drawings of Wall-E online then copied it to a document to enlarge it. After printing, I measured out the base of Wall-E, then cut and pieced those parts. To do the fine details, I flipped the printed image over and used a pencil to trace it on the back, then transfer it onto the appropriate colors. Wall-E is SU's Summer Sun, Basic Grey and Black. I used a circle punch for his eyes and a gel pen to do the details on his eyes and front. For the background, I used the clean eraser on a pencil with White Staz-On, then used a sharpener to make the eraser smaller for the stars. I cut a 3 inch circle from Bold Brights Blue and Green Gable, then cut a rough continent. I crumpled a paper towel and used the Staz-On white reinker to dab some clouds/mist on the Earth. The tag Wall-E is holding is from the goody bags we gave Al's guests and the name on the Journaling box is the name tag on the cookies we made for each guest. The rocket is from Pun Fun stamp set. Thanks for looking and I will try to get more done tomorrow. April
Update: I have had several requests for the link to the picture I used. Here you go! Wall-E picture

Friendship card


We have a couple that has had the worst luck this year. It seems like they can never catch a break and, here a week before school starts, they had a fire that destroyed most of their home. They have two elementary age children and thankfully no one was home at the time of the fire. We are all members of a fraternal organization and the other members have decided to make a donation to purchase them a gift card to begin the replacement of some of their belongings.

This card is made with the SU Wild Wasabi cardstock notes. (They are mis-scored, so I am trying to use them up.) I used some scrap cardstock that is somewhat close to Bashful Blue and the flowers are stamped in Versamark, then covered in white embossing powder. Next, I stamped the image in Jet Black Staz-On, filling in with markers and watercolors. A couple of brads and some nice ribbon adds a finishing touch. I didn't take a photo of the inside, but I folded up a portion and glued the ends to form a pocket for the gift card. I promise to hit the scrap table after the kids go to bed. LOL Thanks for looking! April

Wednesday, August 20, 2008

Celebrate You!


I made this card just for fun. Colors are SU Bold Brights - Only Orange, Green Galore, Tempting Turquoise, Pink Passion, and Orchid Opulance. I stamped the images in three different colors and cut the parts to layer. The stamp is from SU's Greetings Galore. The background is Lots of Dots embossing folder. I punched a couple of small holes in the bottom corner and ran some ribbon through, then added a small rhinestone to the middle of the flower. Staples in the top left corner finish it off.

I am desperate to get back to scrapping, but have a major block. Tomorrow it is my goal to get at least one and begin a Wall-E paper piecing for my son's birthday LO. Thanks for looking...April

Tuesday, August 19, 2008

Older and Wiser


I finally got my hands on the level 3 newly retired "Older and Wiser" from SU. By some miracle, I didn't break the bank doing it either! My friend, Amy (who just so happens to be an SU demo) was over for a playdate, so the kids played while we played. I just love the tab punch and now have to have it. It is just too cute! I also got to play around with the Cuttlebug embossing folders and love them too. I hope they show up in the pictures. No new techniques, just playing around. I didn't get to make cards with all the stamps, but here are the first few. How fun are these??? Thanks for looking! April

Wednesday, July 30, 2008

Ladybug 8x8

This is another 8x8 and this person requested ladybugs and/or girly. I love they ladybugs from Doodlecharms. I cut them in pink and ran the body through a adhesive machine then poured glitter over it. I used the corner rounder to make the scollops and inked around the photo mat. I made a journal box under the small photo mat on the left. Ink is SU's Tempting Turquoise.


This is the last post for a couple of weeks...I am having carpal tunnel surgery tomorrow morning on my fine motor hand, so I will not be able to scrap. Thanks for looking and I will try to get back soon! April

Monday, July 28, 2008

Fishing 8x8


Here is another one for the 8x8 swap. This person requested Hunting and/or Fishing. I found this super cute paper by Karen Foster at the local scrap shop, so here it is. Don't you just love the lures? Stickers from Stickopotomus at Mike's. Cardstock base is from JoAnn's. Easy to put together and so cute! I am not into fishing or hunting, so my creativity on this one took awhile. I still have camping, soccer, pink lady bugs, and flower LO's to get done before Thursday's surgery. If I can finish them, I will be done with all my fall swaps. Thanks for looking! April

Sunday, July 27, 2008

Tie A Yellow Ribbon 'Round the Old Oak Tree challenge


Well, if you haven't figured it out by now, the theme of all the challenges are based on song titles. We had to use yellow ribbon of some kind in the LO. I started out doing this as a monogram challenge, but changed my mind. The purple is SU cardstock from the Bold Brights. The orange and green are from Reminisce called Grampa's Golf Shirt Green/Grandma's Pumpkin Pie. I used SU Bold Brights inks to ink the edges of the paper. Fonts are Mickey Font and All Mixed Up. Journalling font is Tall Paul. Thanks for looking! April

Wednesday, July 23, 2008

Thank You card


This is a cute card I made for a person who has been really supportive of my blog since I started. I hope she likes it! This is another Inkadinkado $1 stamp. Too cute, right? Cardstock colors are from SU's Bold Brights. Stamped image is done in Staz-On and watercolors. I added some bling to look like diamonds. I shadowed under the image and added a couple of rhinestone brads to add a little something. Thanks for looking! april

Tuesday, July 22, 2008

Baby Card


I love this stamp set from Inkadinkado and it is a steal for only $1 at JoAnn's. How cute is this??? My friend just had a baby girl, so this set was fantastic! I used a scrap of paper for one of the 8x8 swaps and used the corner rounder to make the scalloped border. I had a small piece of the pink ribbon for the border and made a bow to go over top of the stamped bow on the baby. I added a couple of little brads and filled the baby in with watercolors. There is also a very pale blue shadow under the baby. Inside says "Welcome Baby", the sentiment that comes with the set, and I added a baby bottle in the corner. Thanks for looking! April

Monday, July 21, 2008

Bop to the Top challenge


Here is my LO for the 8x8 group swap. Yep, I even get to make one for myself! I asked for anything Disney, so here it is. The challenge was to use items from a swap with extra points for using something from one of our members. I used some of the brads that I got from the Mickey and Friends page kit swap. Most of the parts came from a paper pad pack. Enjoy! April

Sunday, July 20, 2008

All American Girl challenge


This one is a patriotic challenge. I luckily just got my 4th of July pics back so here it is. I stamped white stars on the blue, then cut strips of red and stamped USA in white. All of the stamps used are from Michael's dollar bin. I stamped in Jet Black Staz-On on both photos and stamped the title. I sewed buttons on the corner of the title. That's all there was to it! April

I Will Follow Him challenge


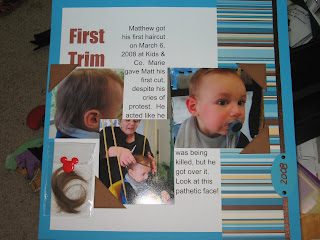
Here is yet another challenge for our virtual crop. It is based on a LO from Pagemaps July 2008. This is my youngest getting his first haircut back in March. He doesn't like anything touching his head, so this was pure torture. I got the paper from Hobby Lobby. I inked the photo corner with brown chalk ink. Title and journalling were done on the computer. Add a little ribbon and lock of hair and done. Thanks for looking! April

Saturday, July 19, 2008

Yes Sir, That's My Baby


This is another virtual crop challenge called "Yes Sir, That's My Baby." We had to make a page featuring one of my kids...like that is hard! Matthew loves Mickey Mouse so we have tons of Disney things - clothes, home decor, toys, etc. I love this Disney Store outfit because of the "Disney" across the bum. I couldn't resist taking this pic of him playing.

The font is Mickey, of course! I got the super cute brads and Mickey die cut are from one of our swaps. The rest is pretty basic...a little paper, metal-rimmed tag and some ribbon. Thanks for looking! April

Tuesday, July 15, 2008

The Thunder Rolls challenge for VC


Here is my LO for a virtual crop challenge. We had to make a LO with something weather related. What better than the pics I have from the recent flooding in Eastern Iowa? In case you take a closer look, these pictures were taken from a car on I-380. The building is our City Hall aka May's Island. The other pic is downtown's First Avenue. During the height of the flood, the DQ sign on the bottom left corner way covered about half way.

This is a pretty basic LO. I printed the journalling on vellum using MS Works. I tried to match the title that came on the paper so it would all flow together. Thanks for looking! April
Monday, July 14, 2008

Virtual Crop card RAK


One of the challenges is to send a RAK to one of the gang from our online group. Here is my card...it is similar to the last card, but I got to use one of the cute acrylic stamps from JoAnn's. How cute is this puppy? I stamped it in black Staz-On and filled in with watercolors. The background is made with the matching bone stamp and Pretty in Pink from SU!'s bold brights. The sentiment is also from the set. The shadow under the puppy is blue chalk. The ribbon is from the dollar bin at my local scrap shop. I used embossing powder on the paw print inside, for a little extra something. As always, thanks for looking! April

Sunday, July 13, 2008

8x8 swaps


Here is my first 8x8 LO for my fall swaps. The swapper requested a music themed one, so here it is...
The base is 8x8 black cardstock, inner B&T is 6x6. The double mat is 6.5x4.5 with the inner mat cut at 6.25x4.25. I used chipboard for the U and R and inked them in black and white. Next, I cut a little black tag for "the" and tied with red ribbon once the ink dried. (The "r" is difficult to see in the photo! :-() I used Jasmine font to cut "music" and "me" from black cardstock. I cut a square and inked in white for "in". I punched holes along the edges of the photo mats and put red rhinestone brads in to compliment the red ribbon. I keep looking at it and thinking that it needs something else. I may add a couple of deco squares or instrument stickers. Have a great day! April

Sunday, July 6, 2008

Wall-E cookies...

Well, you can tell it has been over two years since I have done color flow! I haven't messed with it since taking the Wilton class before the youngest was born, so I really had to read over the directions a dozen times and practice. I forgot how super fast the stuff sets up, but they still turned out super cute. Alex is thrilled. He went over the moon with the tags for each cookie.


I promise I will be back to normal eventually. I still have 8x8 LO's to make for a swap, then I will be out of commission for awhile. I may stick to simple cards or take a break all together. I am still waiting on the doctor to call with the appointment for the neurologist for my hands...at this rate, who knows how long it will take. Thanks for looking! April

Saturday, July 5, 2008

Sis's birthday card


My little sister's birthday is on Monday, so I made this card. I just picked this set up and it is really cute! It is SU!'s Loads of Love and Loads of Love Accessories. On the card base, I used a corner rounder to make a scolloped edge and cut a quarter inch off the front of the card base. I then stamped the hearts on red cardstock in Really Red. Next I stamped the truck, girl, packages, and greeting on watercolor paper with Jet Black Staz-On. I used Crayola watercolors to fill in, then added some Diamond Glaze for the windows and tire rims. I stamped a basic Happy Birthday inside as a final touch. Sorry the photo doesn't to it justice. Hope you all enjoy it and thanks for looking! April

Friday, July 4, 2008

More fall swaps

Happy 4th of July! I spent the entire day (in between feeding kids, diapers and naps) at the scrap table. I finished the deco squares in the previous post and last night finished the photo and journal mats. Theme is Back to School.


Instructions: Photo mat is cut at 5x7 with a 6.5x4.5 inside mat. Journal Mat is 5.5x4 with 5x3.5 inch inside. Cut bus at 2 inches and apple at 1.5 from Doodlecharms. Cut photo corners from Jasmine at 5.5 inches. Print writing lined paper on acid free paper and cut to 3.5x5. Assemble as shown.

As always, thanks for looking! April

Monday, June 30, 2008

More vinyl!

Wow! I am on a roll this week! I am trying to get as many mini projects done and out of the way while summer is flying by. Hope you enjoy the newest project. I will be back to scrapping soon!
Well, here is some more uses for the wall pops and vinyl. I am on a roll. Still have to get pics of the kids doors, but I am waiting until I get the Transformer face done on my son's door. Here are the pics of the new water jugs I picked up for the kids. These are $1.47 each at Walmart. They are kinda cute and Maggie needed a water bottle for camp. I am pretty sure that no one can miss who's bottle that is.

For the pink bottle: Cut flower at 3 inches from the George cartridge. Cut name at 2.5 inches from Jasmine. For the blue bottle: Cut name with shadow at 3.5 inches and again without shadow from Stamped cartridge. Remember, these are tacky and will stick and wear through getting wet. Just be sure the outside of the bottle is clean and dry when you stick them on.

April

Saturday, June 28, 2008

Red, White and Blue Challenge


Well, here is my submission for Stamp Something's Red, White and Blue challenge. Looking at it now, I wish I had layered the triangles and did shadows on the letters. Oh well...my carpal tunnel has been flaring up for days and this is the best it will get for now. Maybe I will make a better one later and post it...

I cut three triangles from George and Basic Shapes at 5.5 inches. Letters are cut from Base Camp. I stamped little stars from Mike's dollar bin...from the July stamps, in VersaMark and embossed with glitter powder. I inked the letters in brown chalk ink. I tied red gingham ribbon at each eyelet and ran white satin ribbon through to connect them all. Not bad for 30 minutes work, eh? Thanks for looking!

April

Friday, June 27, 2008

No more training wheels!


My oldest finally got up the nerve to give up the training wheels! Her grandparents took on the job to teach her how to ride and discovered she had outgown her old bike. Off to the store for a new one and now she is trying to master a bike that is pretty big for her. Of course, little brother outgrew his too, so he too has new wheels.


I am not one to cut my base page into shapes, but this was a pretty simple way to try it out. I like the effect, but next time I think I would cut it down to one pic...I think the second pic gets swallowed by the overall design. I wanted a nice title, so I cut the number out on the cricut and the rest was done via the printer. Gotta love vellum! It is a great way to match your colors and soften them. I love to use different fonts to help tell the story. It is an easy way to dress up a page if you are new to scrapping. Give it a try! Thanks for looking...
April