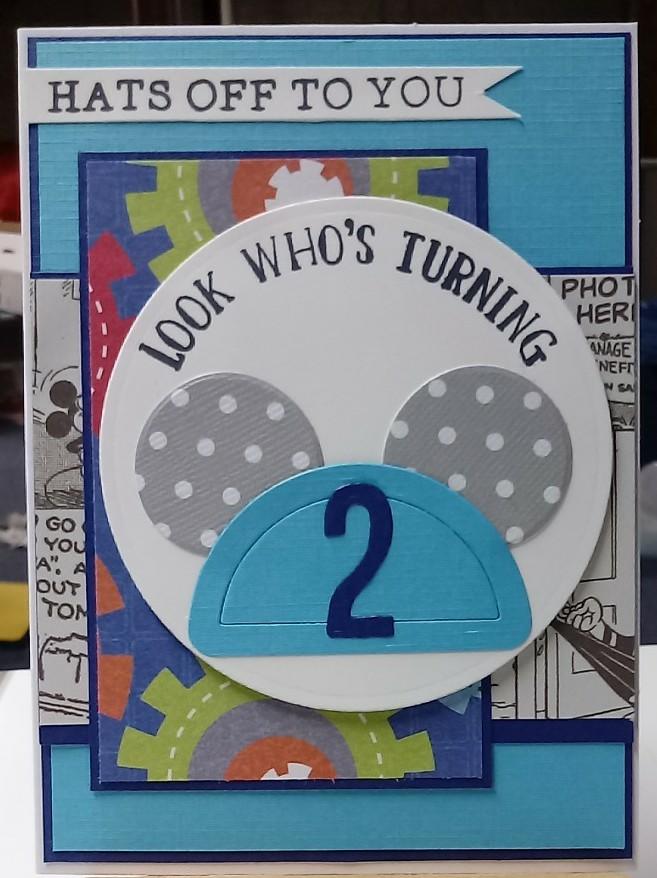
 This is a birthday card I made for my nephew using the Queen & Company Magic shaker die set. The base is Whisper White with layers of navy, turquoise, gray polka dot, and prints from Disney comics and Recollections gears. Sentiments are from the coordinating Q & Co stamps and SU Number of Years. I used the second to largest spellbinders circle die for the hat base. The number 2 is a Tim Holtz die. The circle is popped up with foam tape. Inspiration for the card was found here. Thanks for looking! April
Monday, June 3, 2019
Hats Off
This is a birthday card I made for my nephew using the Queen & Company Magic shaker die set. The base is Whisper White with layers of navy, turquoise, gray polka dot, and prints from Disney comics and Recollections gears. Sentiments are from the coordinating Q & Co stamps and SU Number of Years. I used the second to largest spellbinders circle die for the hat base. The number 2 is a Tim Holtz die. The circle is popped up with foam tape. Inspiration for the card was found here. Thanks for looking! April


Monday, March 11, 2019
All About Me album
 Ginger, at My Sisters Scrapper, made an adorable Disney mini envelope album. I followed her tutorial and made one of my own. I liked the format so well, I used it as an excuse to cull some of my paper hoarding.
This album is made using papers from Stampin Up's retired Class Act papers from their old Simply Scrappin line...yep, that paper is probably more than 5 years old and moved to three different states!
Colors include: Basic Black, Basic Grey, Whisper White, Crushed Curry, Bashful Blue, and Real Red.
All the rounded flaps are cards that come out of the album and every page features a flip of pocket with extra storage inside. I made cards for many of the pockets where school pics or memories can be stored.
Thanks for looking! April


Tuesday, February 12, 2019
Birthday Brew
Wow, it has been way too long since my last post. It is not for lack of crafting, more time shortages. I have one kiddo away at college, middle child is busy with the high school robotics team and the spring musical, the youngest has medical appointments. By the time I get everyone settled, I may get a few quick projects going and then off to bed!
This is for my hubby's be st friend. He is a fan of home-brewed beer, so I used Stampin' Up's Bubble Over set. The base is Lemon-Lime Twist with layers of Whisper White and retired DSP. I stamped the bottles using Versamark, then heat embossed with extra thick chunky clear emboss to get the drippy glossy finish. I stamped again in Real Red and Pacific Point for the label wraps. The tags are in Tempting Turquoise and Lemon Lime Twist. All the die cuts are from the bottles coordinating dies. I also used the dies to cut some of the designer paper bottles (retired). I popped the labels up on dimensionals and cut the bottle tops from gold foil.
 st friend. He is a fan of home-brewed beer, so I used Stampin' Up's Bubble Over set. The base is Lemon-Lime Twist with layers of Whisper White and retired DSP. I stamped the bottles using Versamark, then heat embossed with extra thick chunky clear emboss to get the drippy glossy finish. I stamped again in Real Red and Pacific Point for the label wraps. The tags are in Tempting Turquoise and Lemon Lime Twist. All the die cuts are from the bottles coordinating dies. I also used the dies to cut some of the designer paper bottles (retired). I popped the labels up on dimensionals and cut the bottle tops from gold foil.
TIP: I keep the foil scraps from other projects and cut a ton of the bottle tops at once. I store them in a mini zip baggie for beads, storing it in the stamp case. I also use magnetic tape in the case to hold the dies inside the coordinating stamp case.
bubbles in Calypso Coral, Lemon-Lime Twist, and Tempting Turquoise. Thanks for looking! April


Monday, December 24, 2018
Disney Orange Bird Purse DIY

Amy at As the Bunny Hops was kind enough to put up her Studio file, but it wasn't easy to move the file to Design Studio. I finally found an online converter that seemed to do the trick and I had to play around to get the image through contour so I could have all the layers.
I started with the inside of the beak (cut in brown vinyl), then the full beak (yellow). The image shows up a tad wonky in DS, showing just the lines around the inner mouth and no way to fill it so I cut the full mouth and just weeded the outer beak. It wasn't too much vinyl (less than a 2x2" square). Next I contoured the eyes. I started out doing the larger part by contouring all three parts of the eye as one group so I can weed the pupil out. (I ended up layering the white and black, but fixed that after the fact in DS, so the next time I cut it they will nest.) Last I contoured the pupil and brows.
Once I figured out how the contour worked, I placed all the pieces back together like a puzzle and grouped them. When you hit the Make button, it splits all the colors into separate mats. To make it easier to put together, I used the Write function to make a scale base to build on. I taped the picture to a light box, then taped each layer over the image as I worked. I picked up the black cut first, taped the white to the picture and used the image to place the pupils in the right position. Be careful not to let the vinyl touch the paper! Once the eyes were together, I used tweezers to put the inner mouth on the beak, then taped the completed beak in place over the image and repeated my steps to pic up the mouth. Last, place on purse and rub!
I am waffling about whether to paint the leaf a lighter green like Amy did. I don't think it looks too bad and the more vintage pics show a bit darker green so I am thinking I will leave it. I will say, I am looking to replace the chain strap that came with the purse, so it's off to the craft store.
Thanks for looking! April
Friday, October 26, 2018
Hershey Kisses gift card holder

The base is Cherry Cobbler and stamped in Cherry Cobbler using the star from Stampin Up's Tin of Tags. The window is punched from the Word Window punch. I used a layer of Very Vanilla cardstock and stamped the sentiment in Cherry Cobbler, the string and plugs in Momento Tuxedo Black, and the bulbs in Tempting Turquoise, Pumpkin Pie, and Lemon Lime Twist. The bulbs are popped onto dimensionals. A 1" circle punch was used to make the notch for the gift card.

Thanks for looking! April
Subscribe to:
Posts (Atom)